

Push to CRM
Push to CRM lets you send IP Pilot data, law firms, applicants, and attorneys, directly into your CRM, so the data you analyze in IP Pilot stays in sync with the system your team works in every day.
Setting up and using the feature happens in three stages:
- Connect IP Pilot to your CRM.
- Map the fields between IP Pilot and your CRM.
- Push the data from IP Pilot into your CRM.
Push to CRM is a Pro feature. IP Pilot currently supports HubSpot, Salesforce, and Microsoft Dynamics. The setup process is the same for all three.
Stage 1: Connect IP Pilot to your CRM
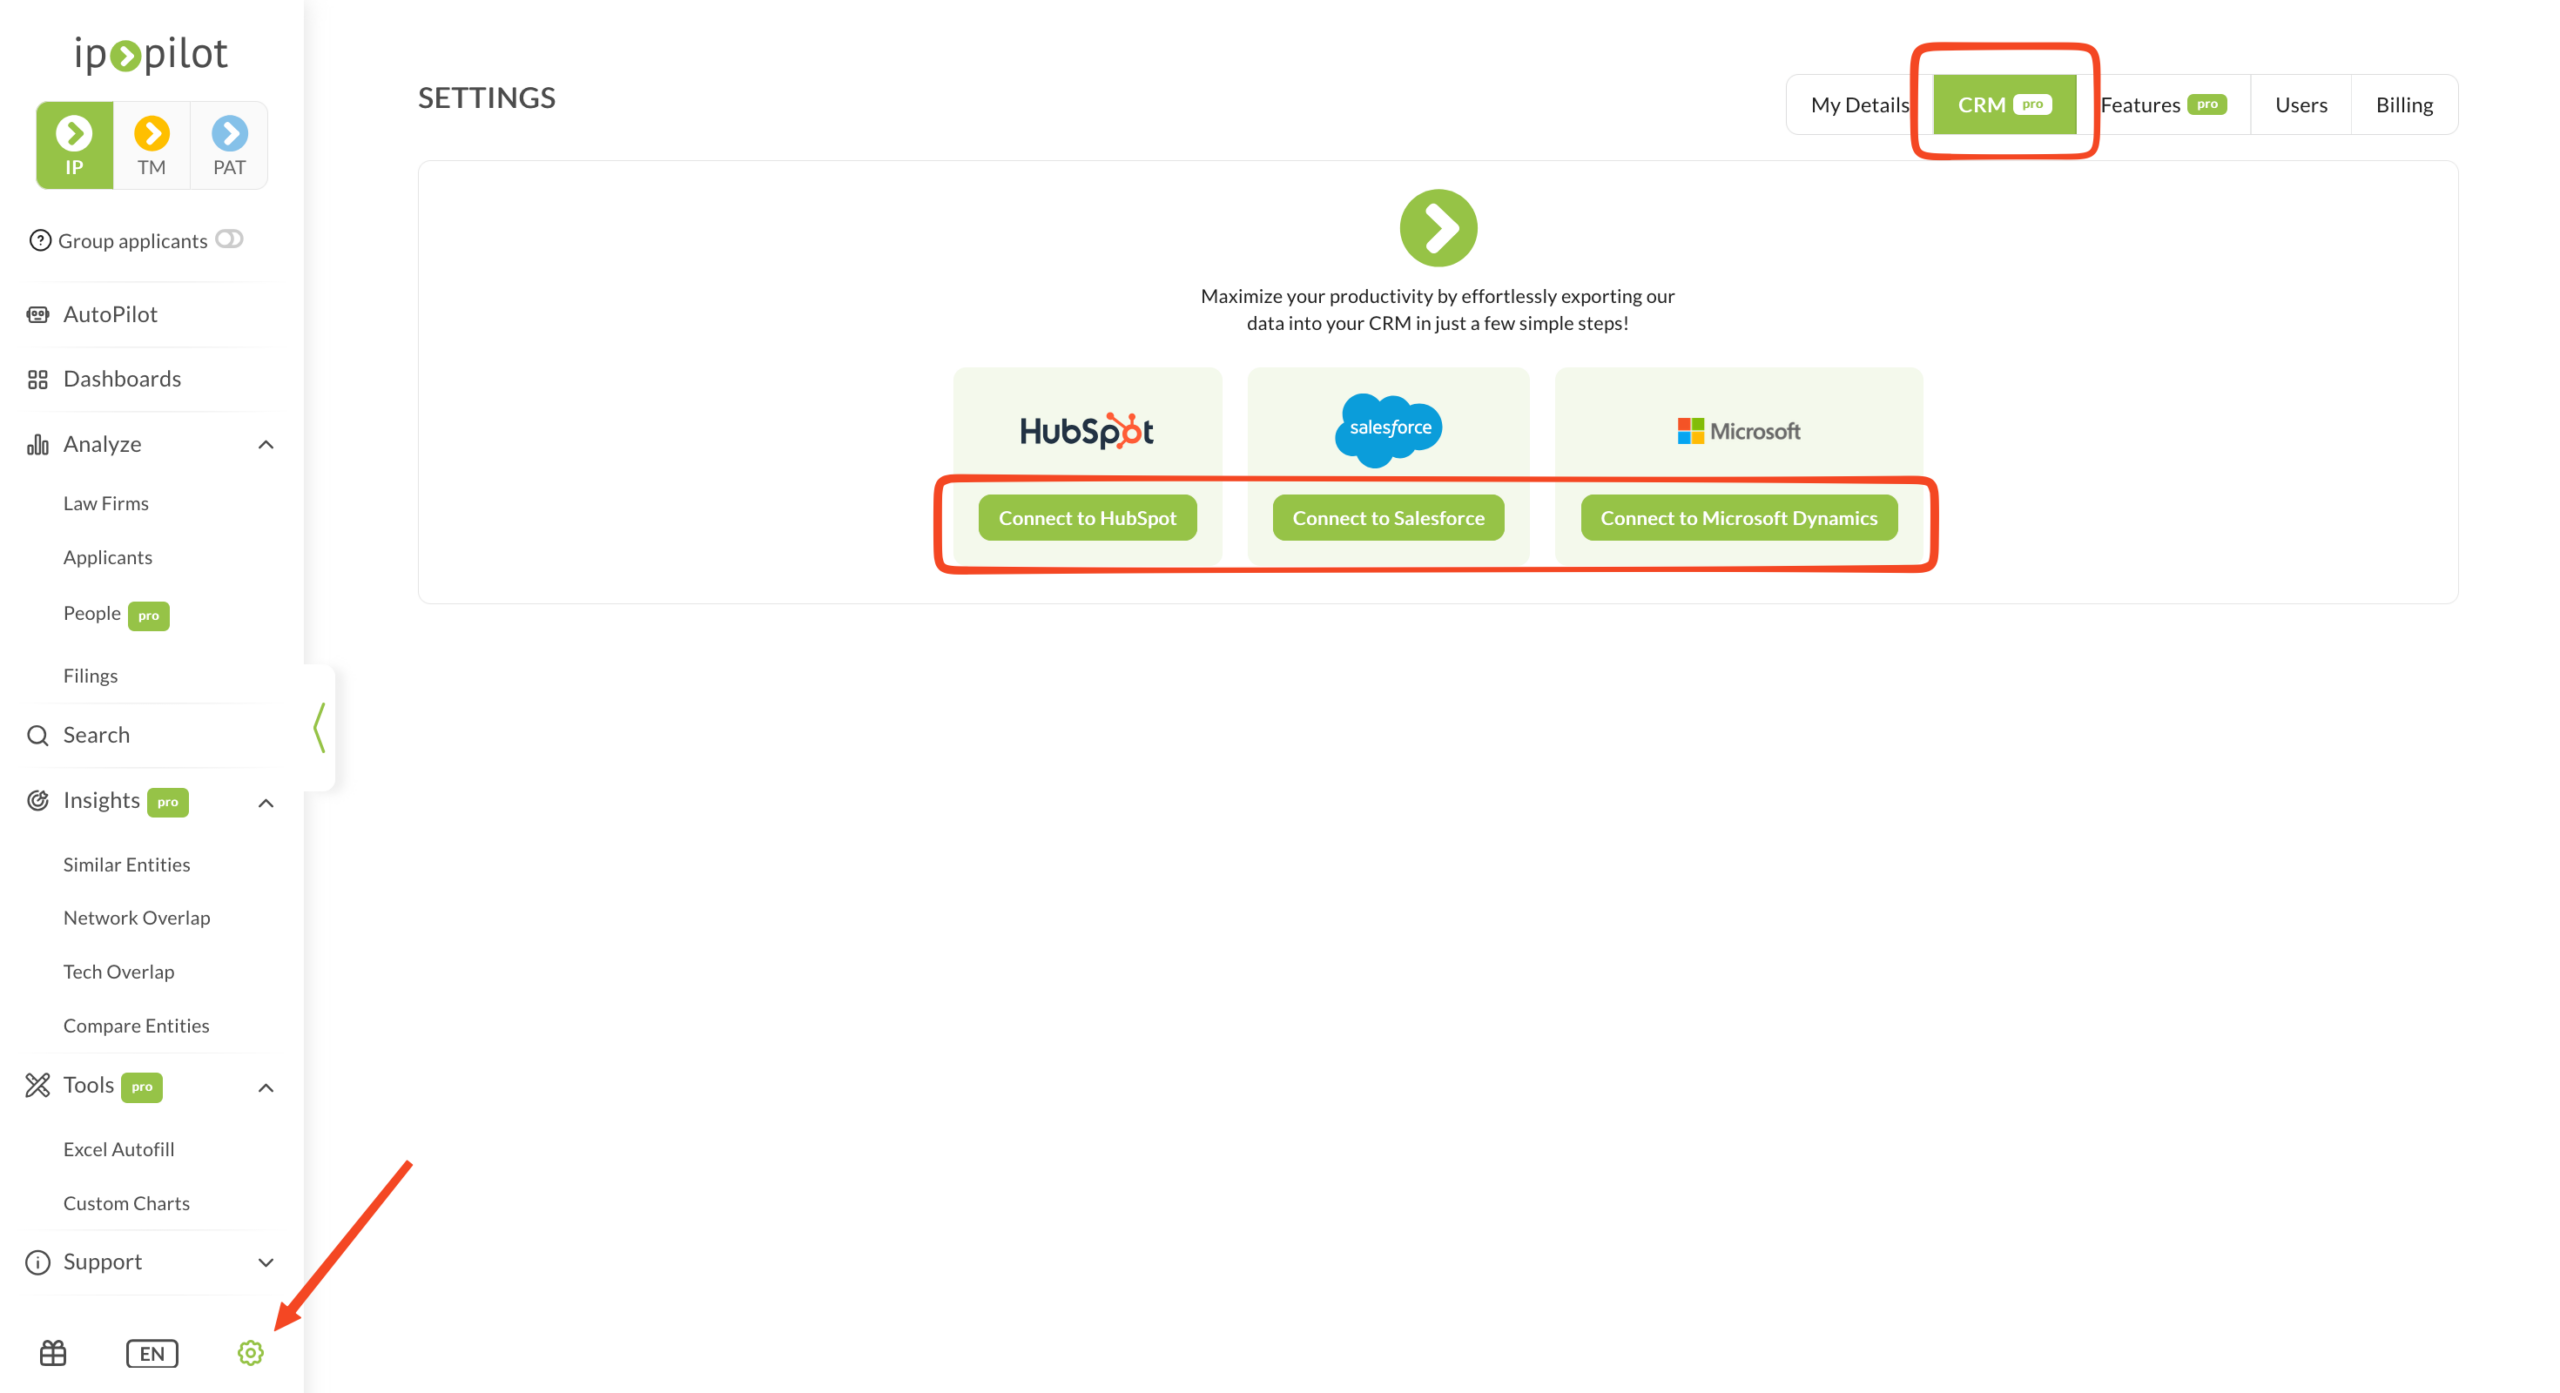
- Click the settings icon (gear) at the bottom of the left sidebar.
- Open the CRM tab in the top-right corner of the Settings page.
- Choose the CRM you want to connect to and click the corresponding button, Connect to HubSpot, Connect to Salesforce, or Connect to Microsoft Dynamics.
-
You will be taken to your CRM’s authorization screen. Select the account you want to connect, then grant IP Pilot permission to push data into your CRM and to read its properties (fields).Once the connection is established, go back to the original browser tab and refresh the page so the changes are synchronized.

-
After refreshing, the CRM settings page shows Connected to [Hubspot/Salesforce/Microsoft Dynamics] CRM in the top-right corner, along with a Disconnect option. You can now configure your preferences and field mapping.

Stage 2: Map your fields
Field mapping defines which IP Pilot data goes into which CRM property (field), and how. It has three parts: setting your preferences, selecting the allowed fields from your CRM, and mapping IP Pilot fields to those CRM fields.
Set your preferences
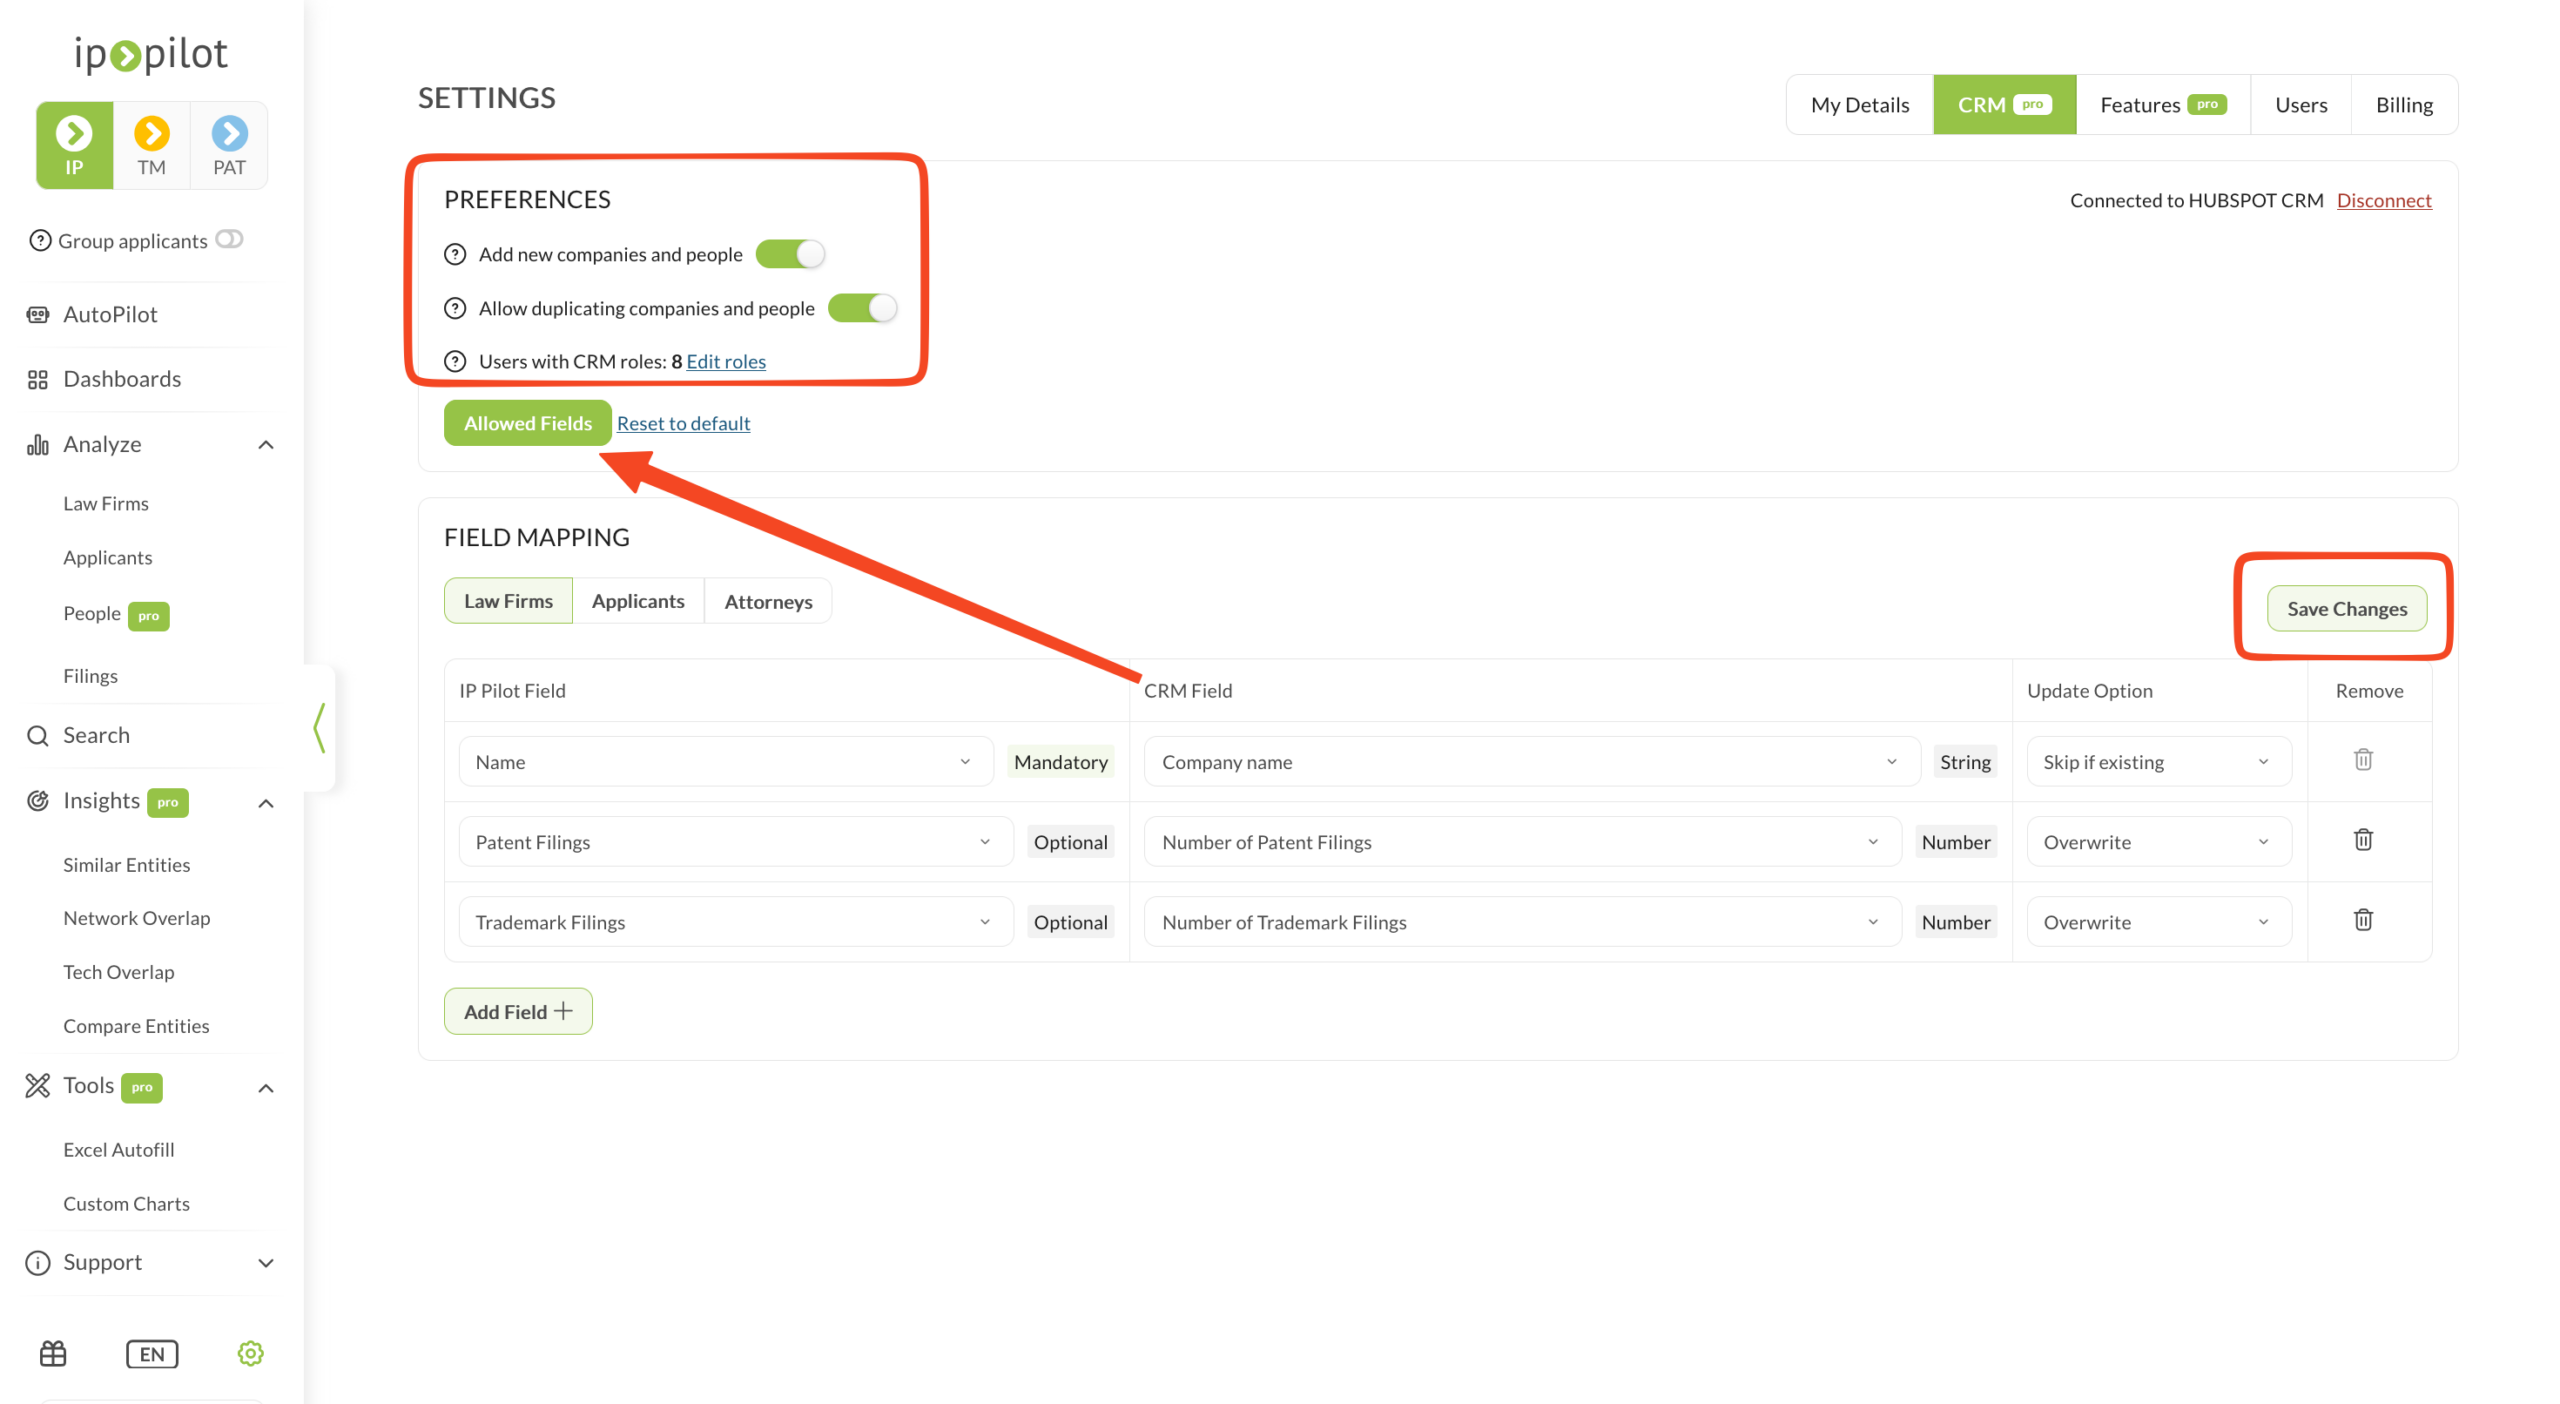
At the top of the CRM settings page, under Preferences, you have the following options:
- Add new companies and people – When enabled, IP Pilot can create new company and contact entries in your CRM. New entries are only created when you approve them at push time.
- Allow duplicating companies and people – When enabled, IP Pilot can create duplicate companies and contacts. Duplicates are only created when you approve them at push time.
- Users with CRM roles – Shows how many IP Pilot users have CRM access. Click Edit roles to manage them and set each user as a CRM admin or as someone with push access only.
- Allowed Fields – Opens the option where you select which CRM properties (fields) IP Pilot is allowed to access (see below).
Select your allowed fields (properties)
Before you start: The properties you want to push into must already exist in your CRM. Create any missing fields in your CRM first so they appear in this list.
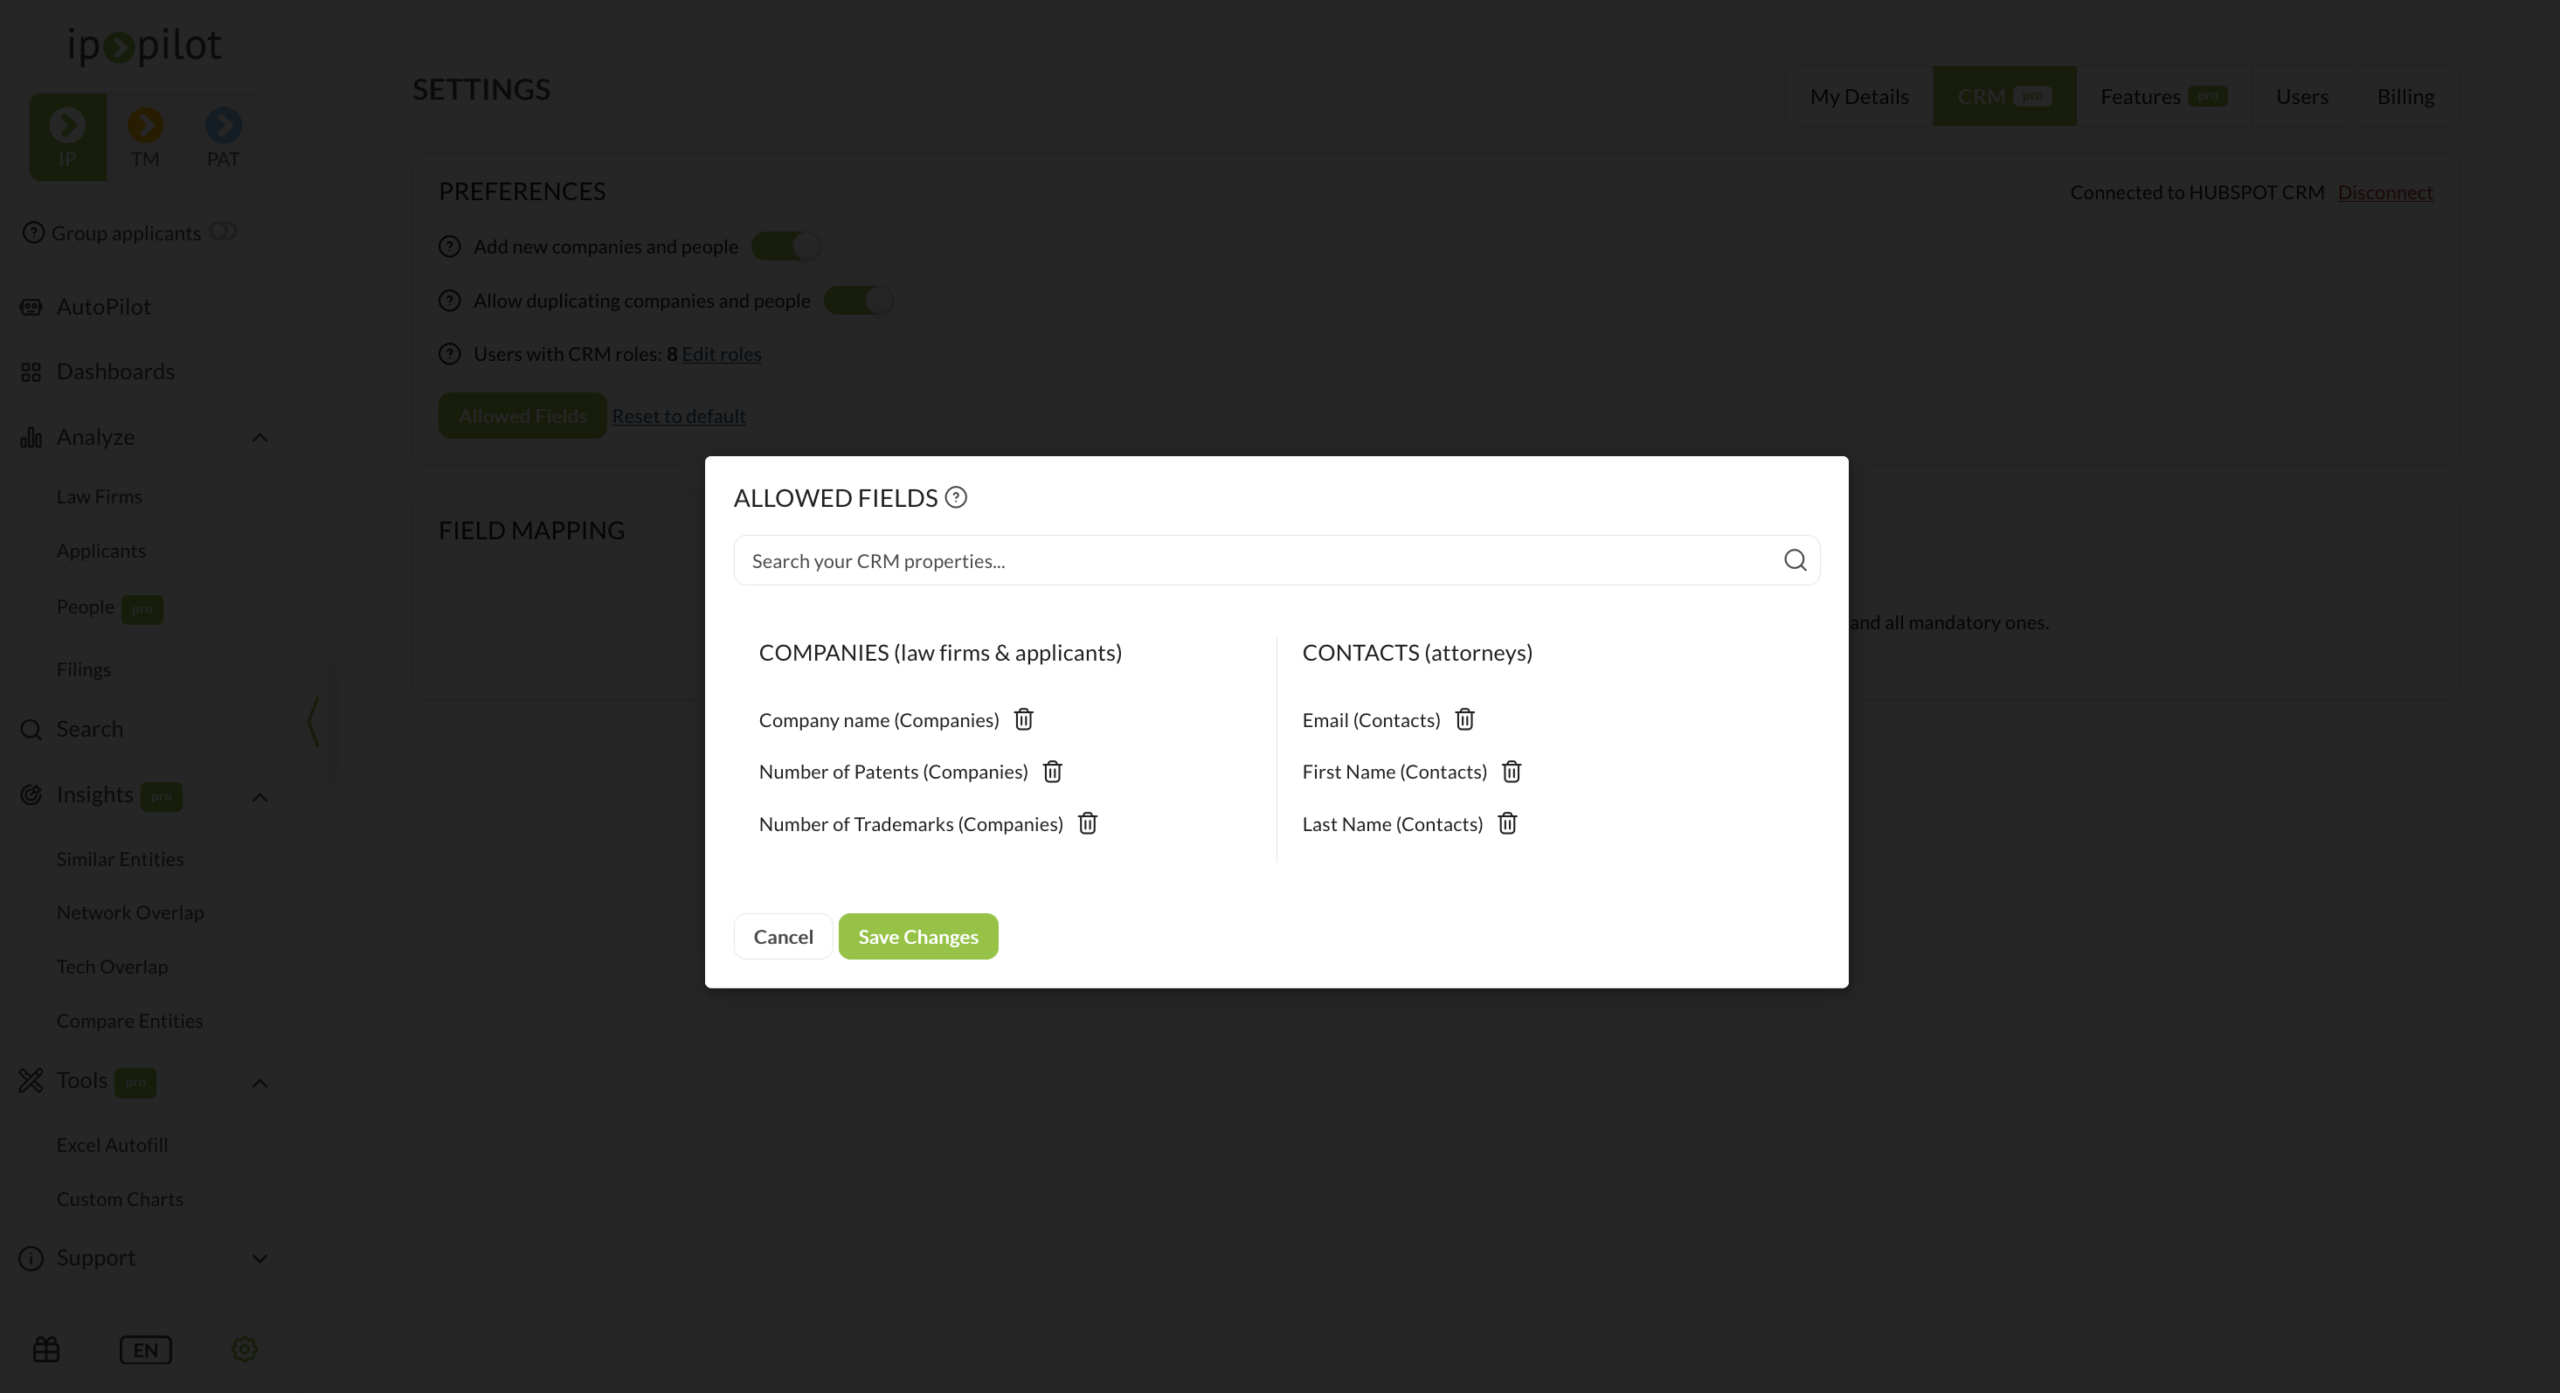
- Click Allowed Fields.
- Use the search bar to find the properties (fields) in your CRM.
- Select every property (field) you want IP Pilot to be able to write to. Properties (fields) are grouped into Companies (law firms and applicants) and Contacts (attorneys).
For example, for companies you might allow Company name, Number of Patents, and Number of Trademarks; for contacts you might allow Email, First Name, and Last Name. Selecting a property gives IP Pilot permission to push data into it, but only after you approve each individual push.
4. Click Save Changes.
Map IP Pilot fields to CRM fields
In the Field Mapping section, use the Law Firms, Applicants, and Attorneys tabs to map fields for each entity type.
- Click Add Field and select the IP Pilot field you want to map (for example, Name, Patent Filings, Trademark Filings).
- Choose the corresponding CRM field from the allowed fields you selected earlier.
- Set the Update Option for each field:
- Skip if existing – leaves the CRM value unchanged if it already has data.
- Overwrite – replaces the existing CRM value with the IP Pilot value.
- Click Save Changes.
Mandatory fields (such as Name) are marked accordingly; the rest are optional.
Stage 3: Push data to your CRM
Once your fields are mapped, you can push data from the Law Firms, Applicants, and Attorneys sections.
- Open a profile in any of those sections.
- At the top of the profile, next to the year-type selector, click the CRM button to start the push.

- IP Pilot searches your CRM for entries with a matching name:
- If a match is found, the existing entities are shown. Select the one you want. To use a different entity, search for a name in the search field, or paste the entity’s URL from your CRM into the Destination Link field.
- If no match is found, IP Pilot takes you to the New Entity section so you can create one.
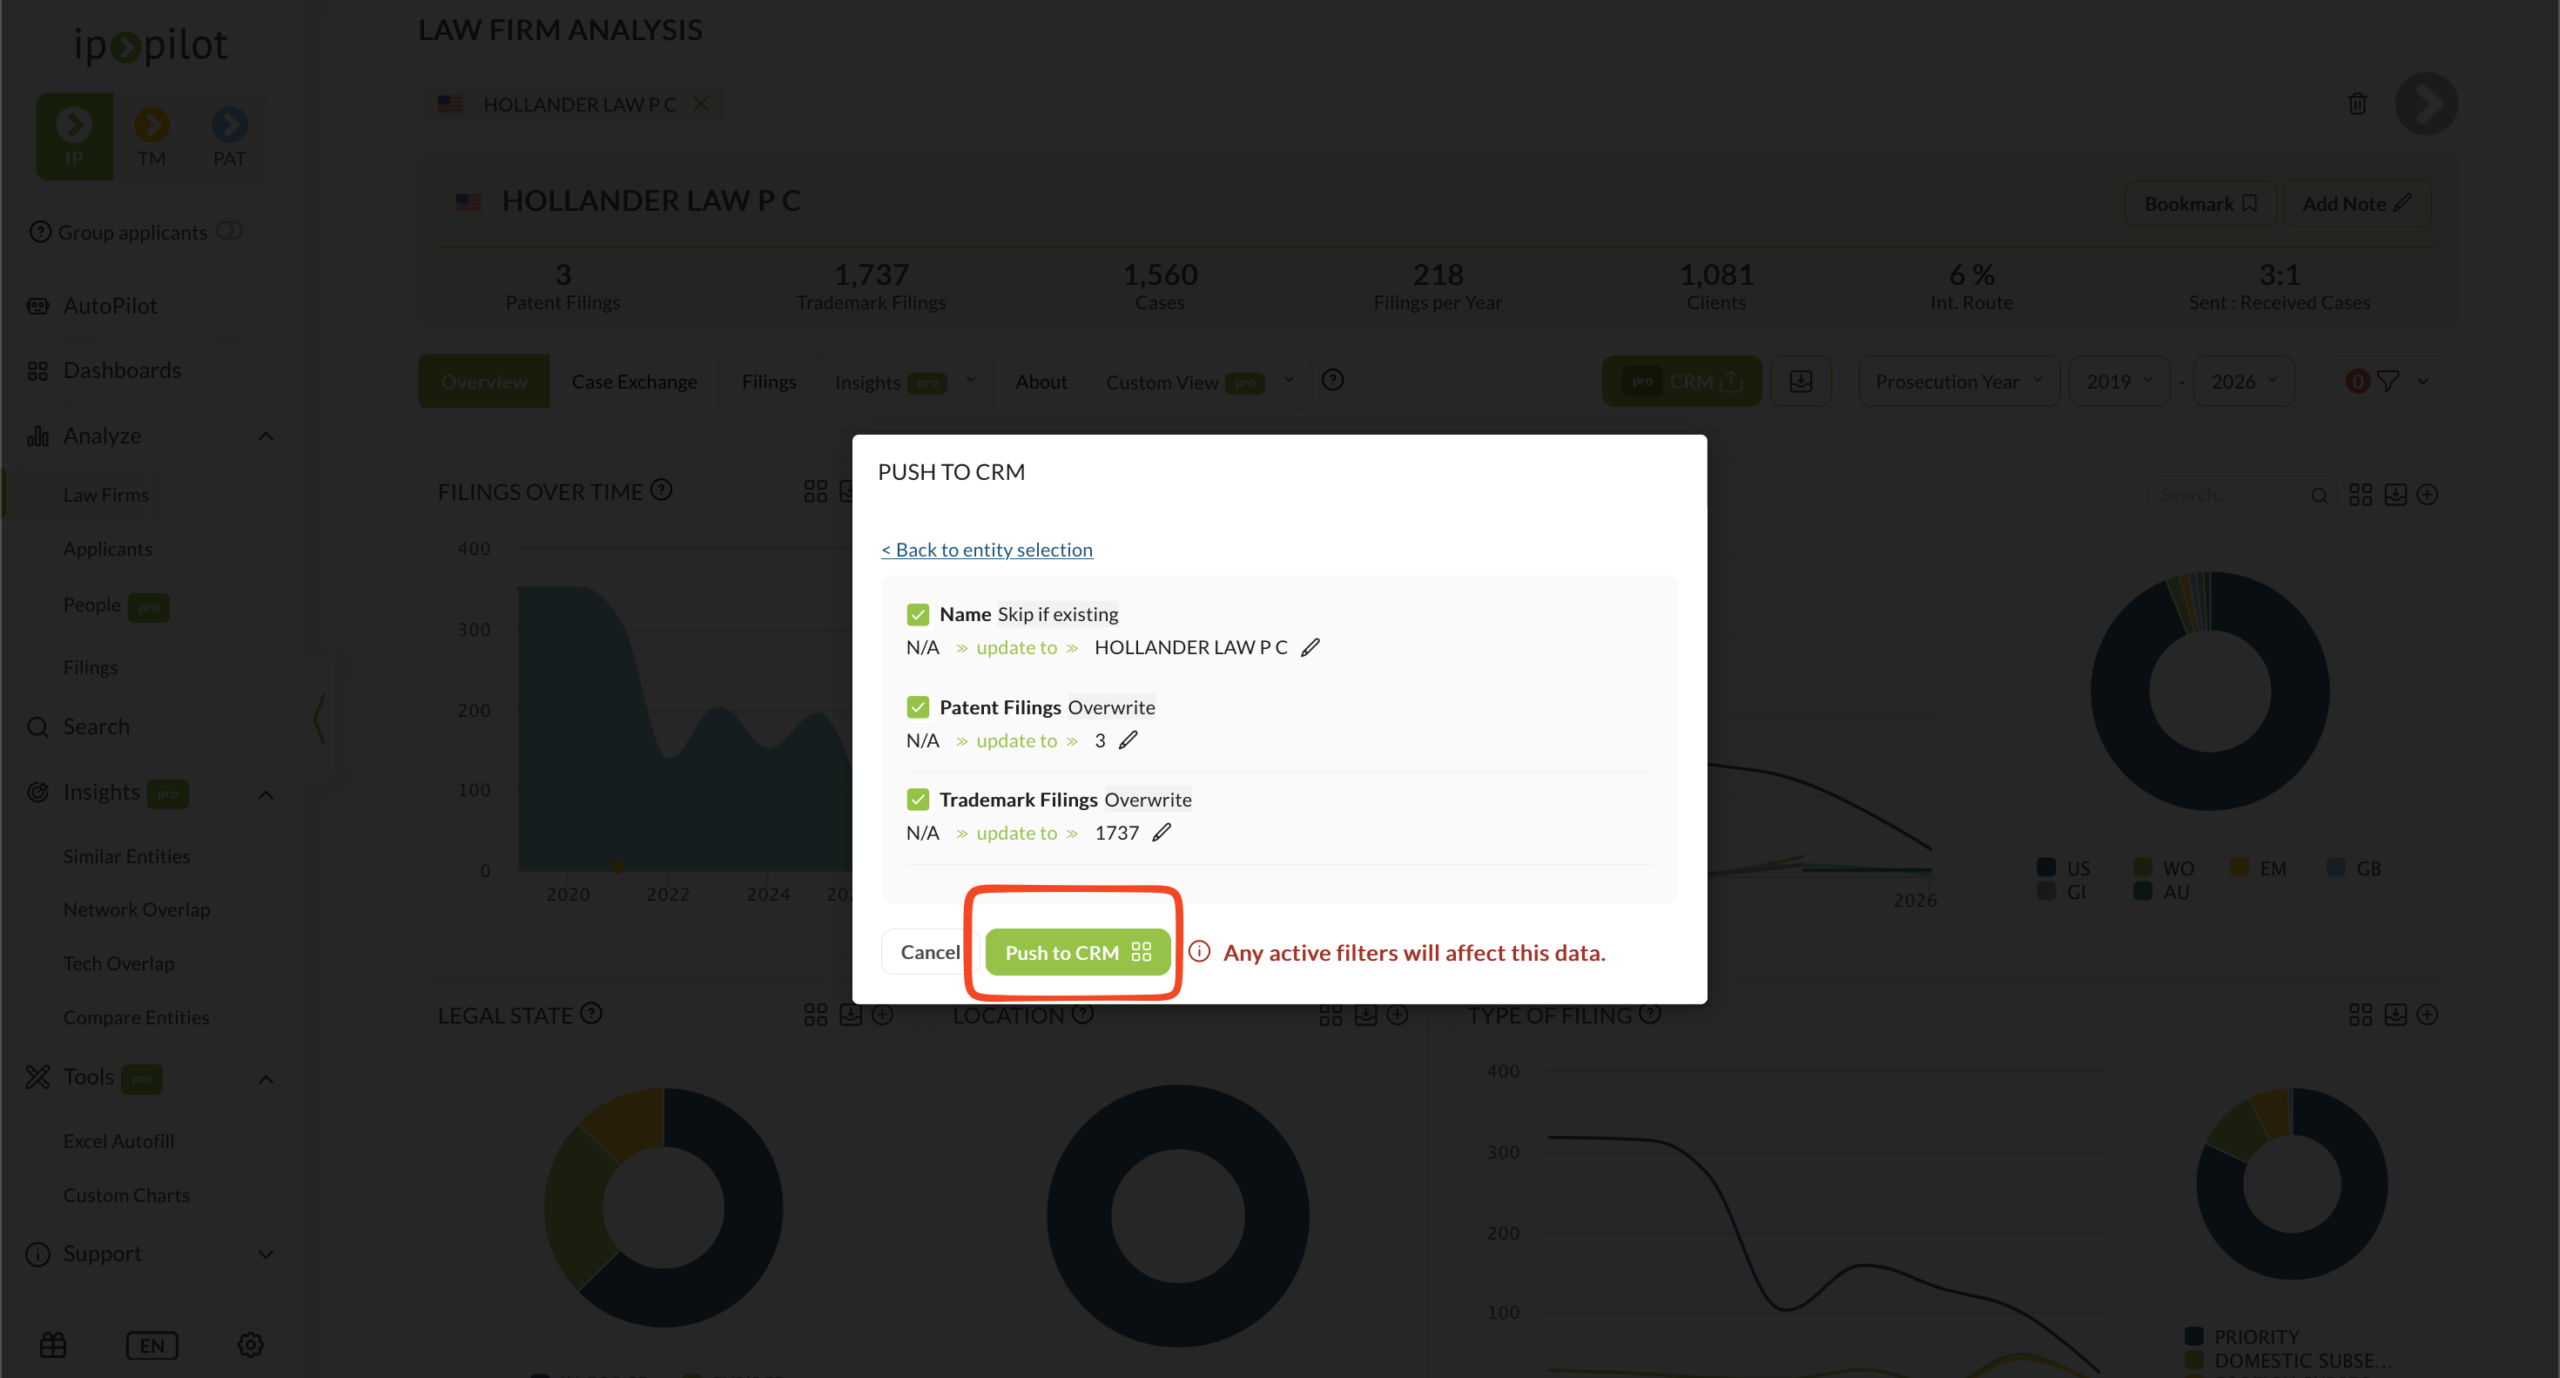
- Click See Preview to review exactly what will be pushed.
- Click Push to CRM to send the data.
Good to know
- Only the mapped data from the KPI bar and Contact details of Attorneys is pushed to your CRM.
- Any active filters and the chosen year-type affect the data being pushed. Check your filters before pushing so the values match what you intend to send.
- The CRM properties (fields) you map to must exist in your CRM beforehand. If a field is missing from the Allowed Fields list, create it in your CRM and refresh.
Use case:
FAQ’s