
Push to CRM sends IP Pilot data on law firms, applicants and attorneys into your firm’s CRM. The figures you analyze in IP Pilot then reach the system your team works in, and nobody has to copy them by hand. IP Pilot connects to HubSpot, Salesforce and Microsoft Dynamics, and the setup is the same for all three.
Push to CRM is one of several ways to get data out of IP Pilot. Use it for data that belongs in a client or prospect record that you keep over time. Excel Autofill fills the same data points for a long list of entities. Exports gives you a chart, a table or a whole profile as a file.
You set it up once: connect IP Pilot to the CRM, then map the fields between the two systems. After that, you push one profile at a time. Law Firms, Applicants and People explain the profiles.
Before you connect #
- The CRM properties must exist first. IP Pilot writes into properties that are already set up in your CRM. It does not create them. Create any missing property in the CRM, and it then shows in the Allowed Fields list.
- The connection grants read and write access. When you authorize it, IP Pilot can read your CRM’s properties and write records into it. Whether this needs elevated rights depends on your CRM’s own permission model, not on IP Pilot.
- Connecting and mapping need a CRM role. The CRM tab in Settings shows only for a role that includes CRM. Section 5 explains the roles.
Nothing is written silently. When you allow a property, or enable new and duplicate records, you only give IP Pilot the option. You preview and approve every push before anything reaches the CRM.
1. Connect IP Pilot to your CRM #
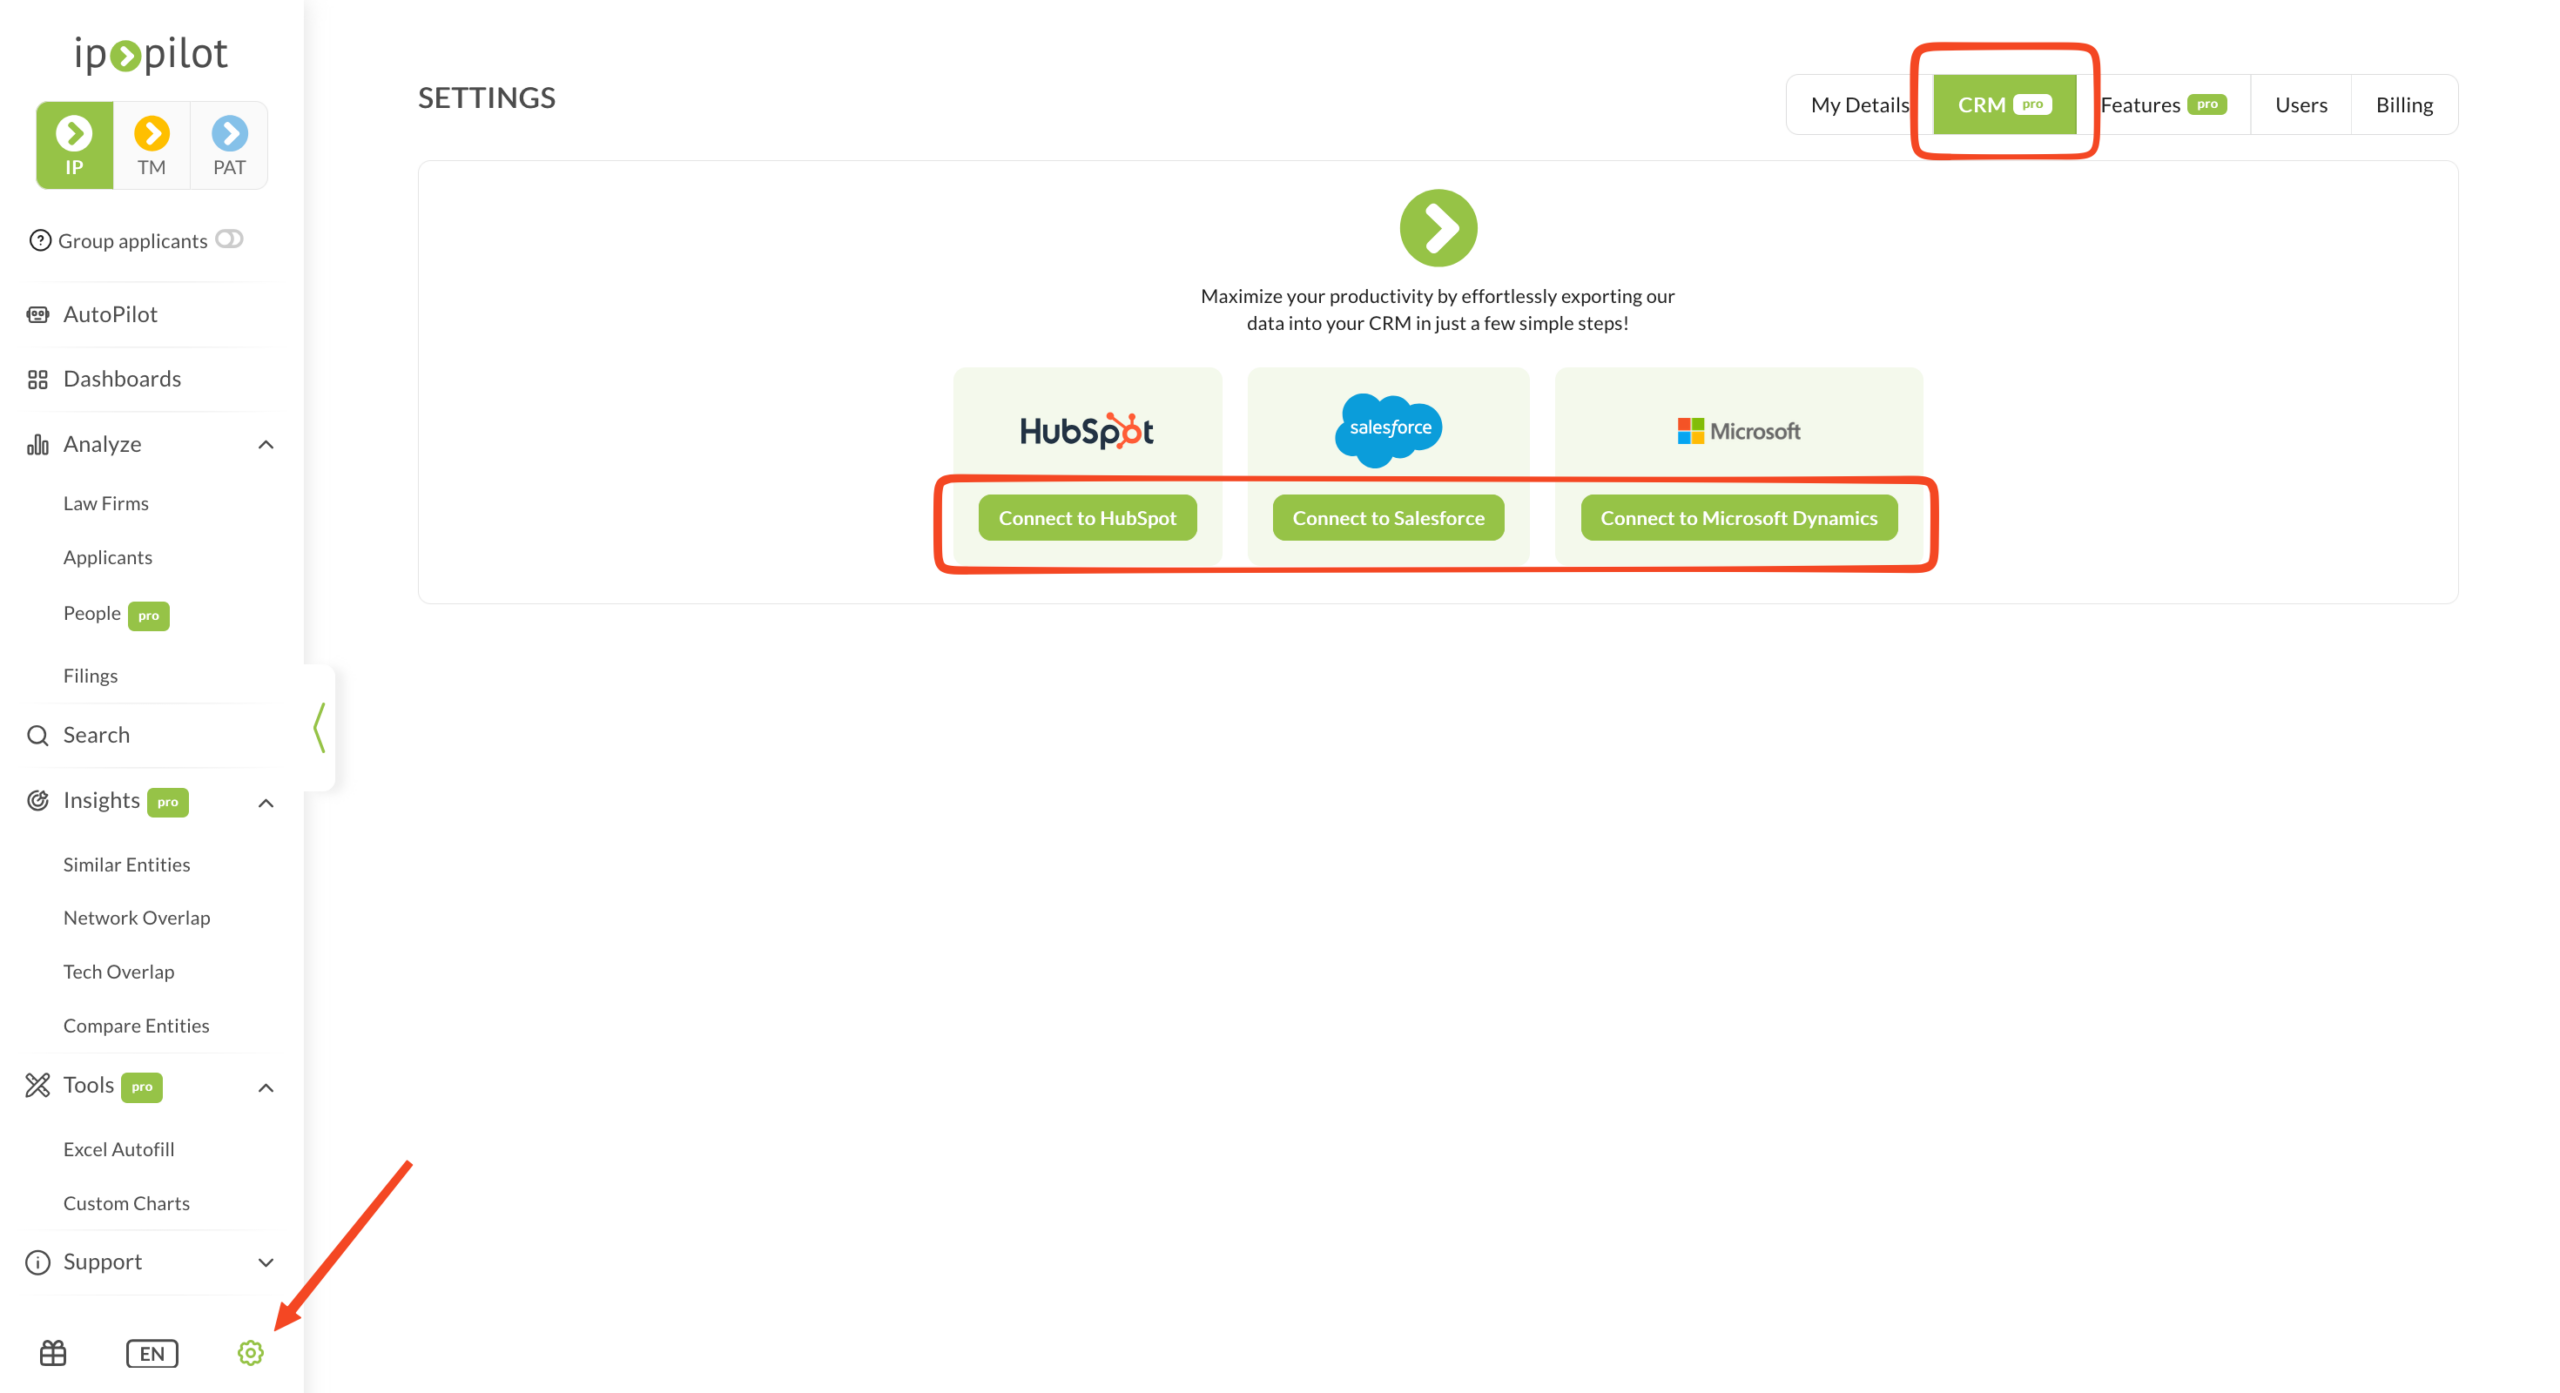
- 1Open SettingsClick the gear icon at the bottom of the left sidebar.
- 2Go to the CRM tabOpen the CRM tab.Note: If Settings shows only My Details, Features, Users and Billing, your role does not include CRM. See section 5.
- 3Pick your CRMClick Connect to HubSpot, Connect to Salesforce or Connect to Microsoft Dynamics.
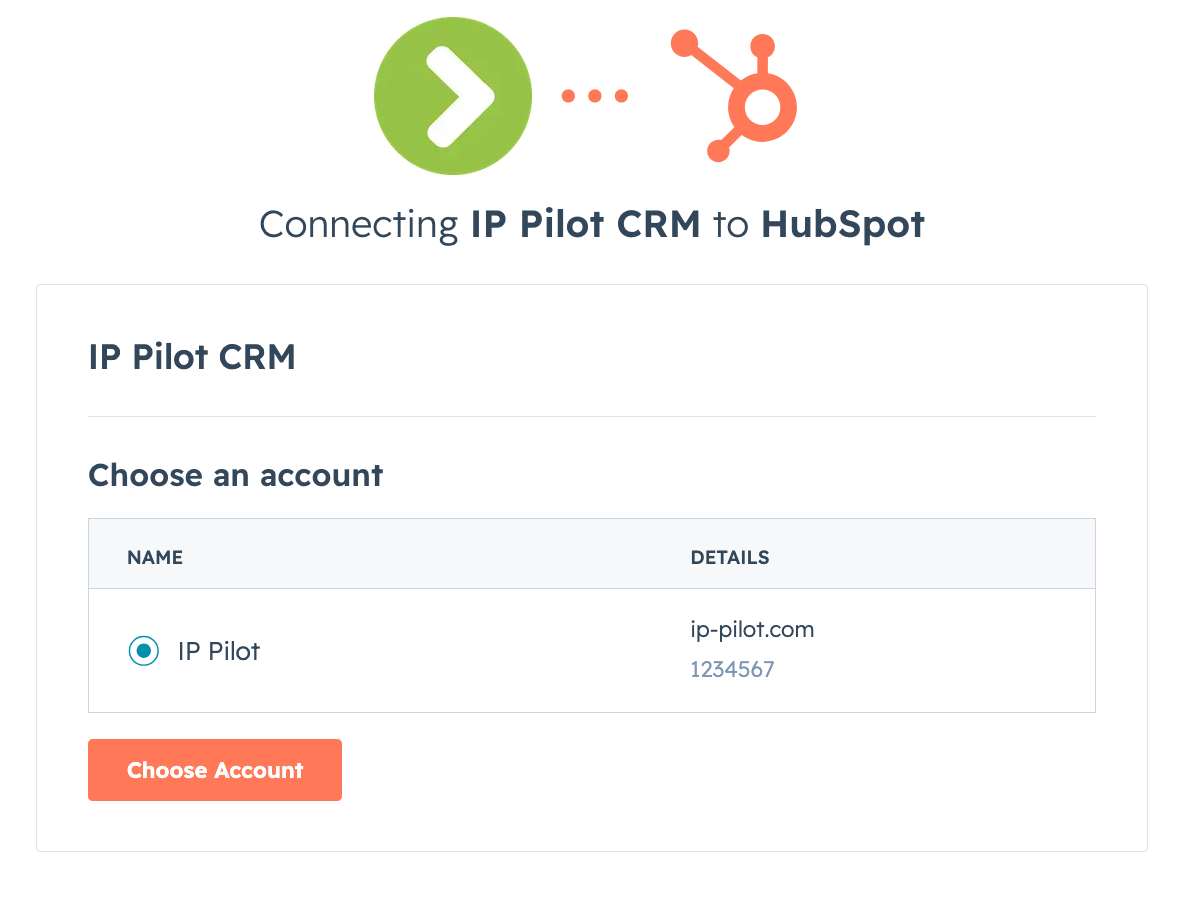
- 4Authorize the connectionYour CRM’s authorization screen opens. Select the account to connect. Then allow IP Pilot to read its properties and to write data into it.
- 5Refresh IP PilotGo back to the original browser tab and refresh the page. The top right of the CRM settings page then reads Connected to … CRM, with a Disconnect option. The preferences and the field mapping are now available.Note: If you do not refresh, IP Pilot continues to show the CRM as not connected, even though the authorization worked.
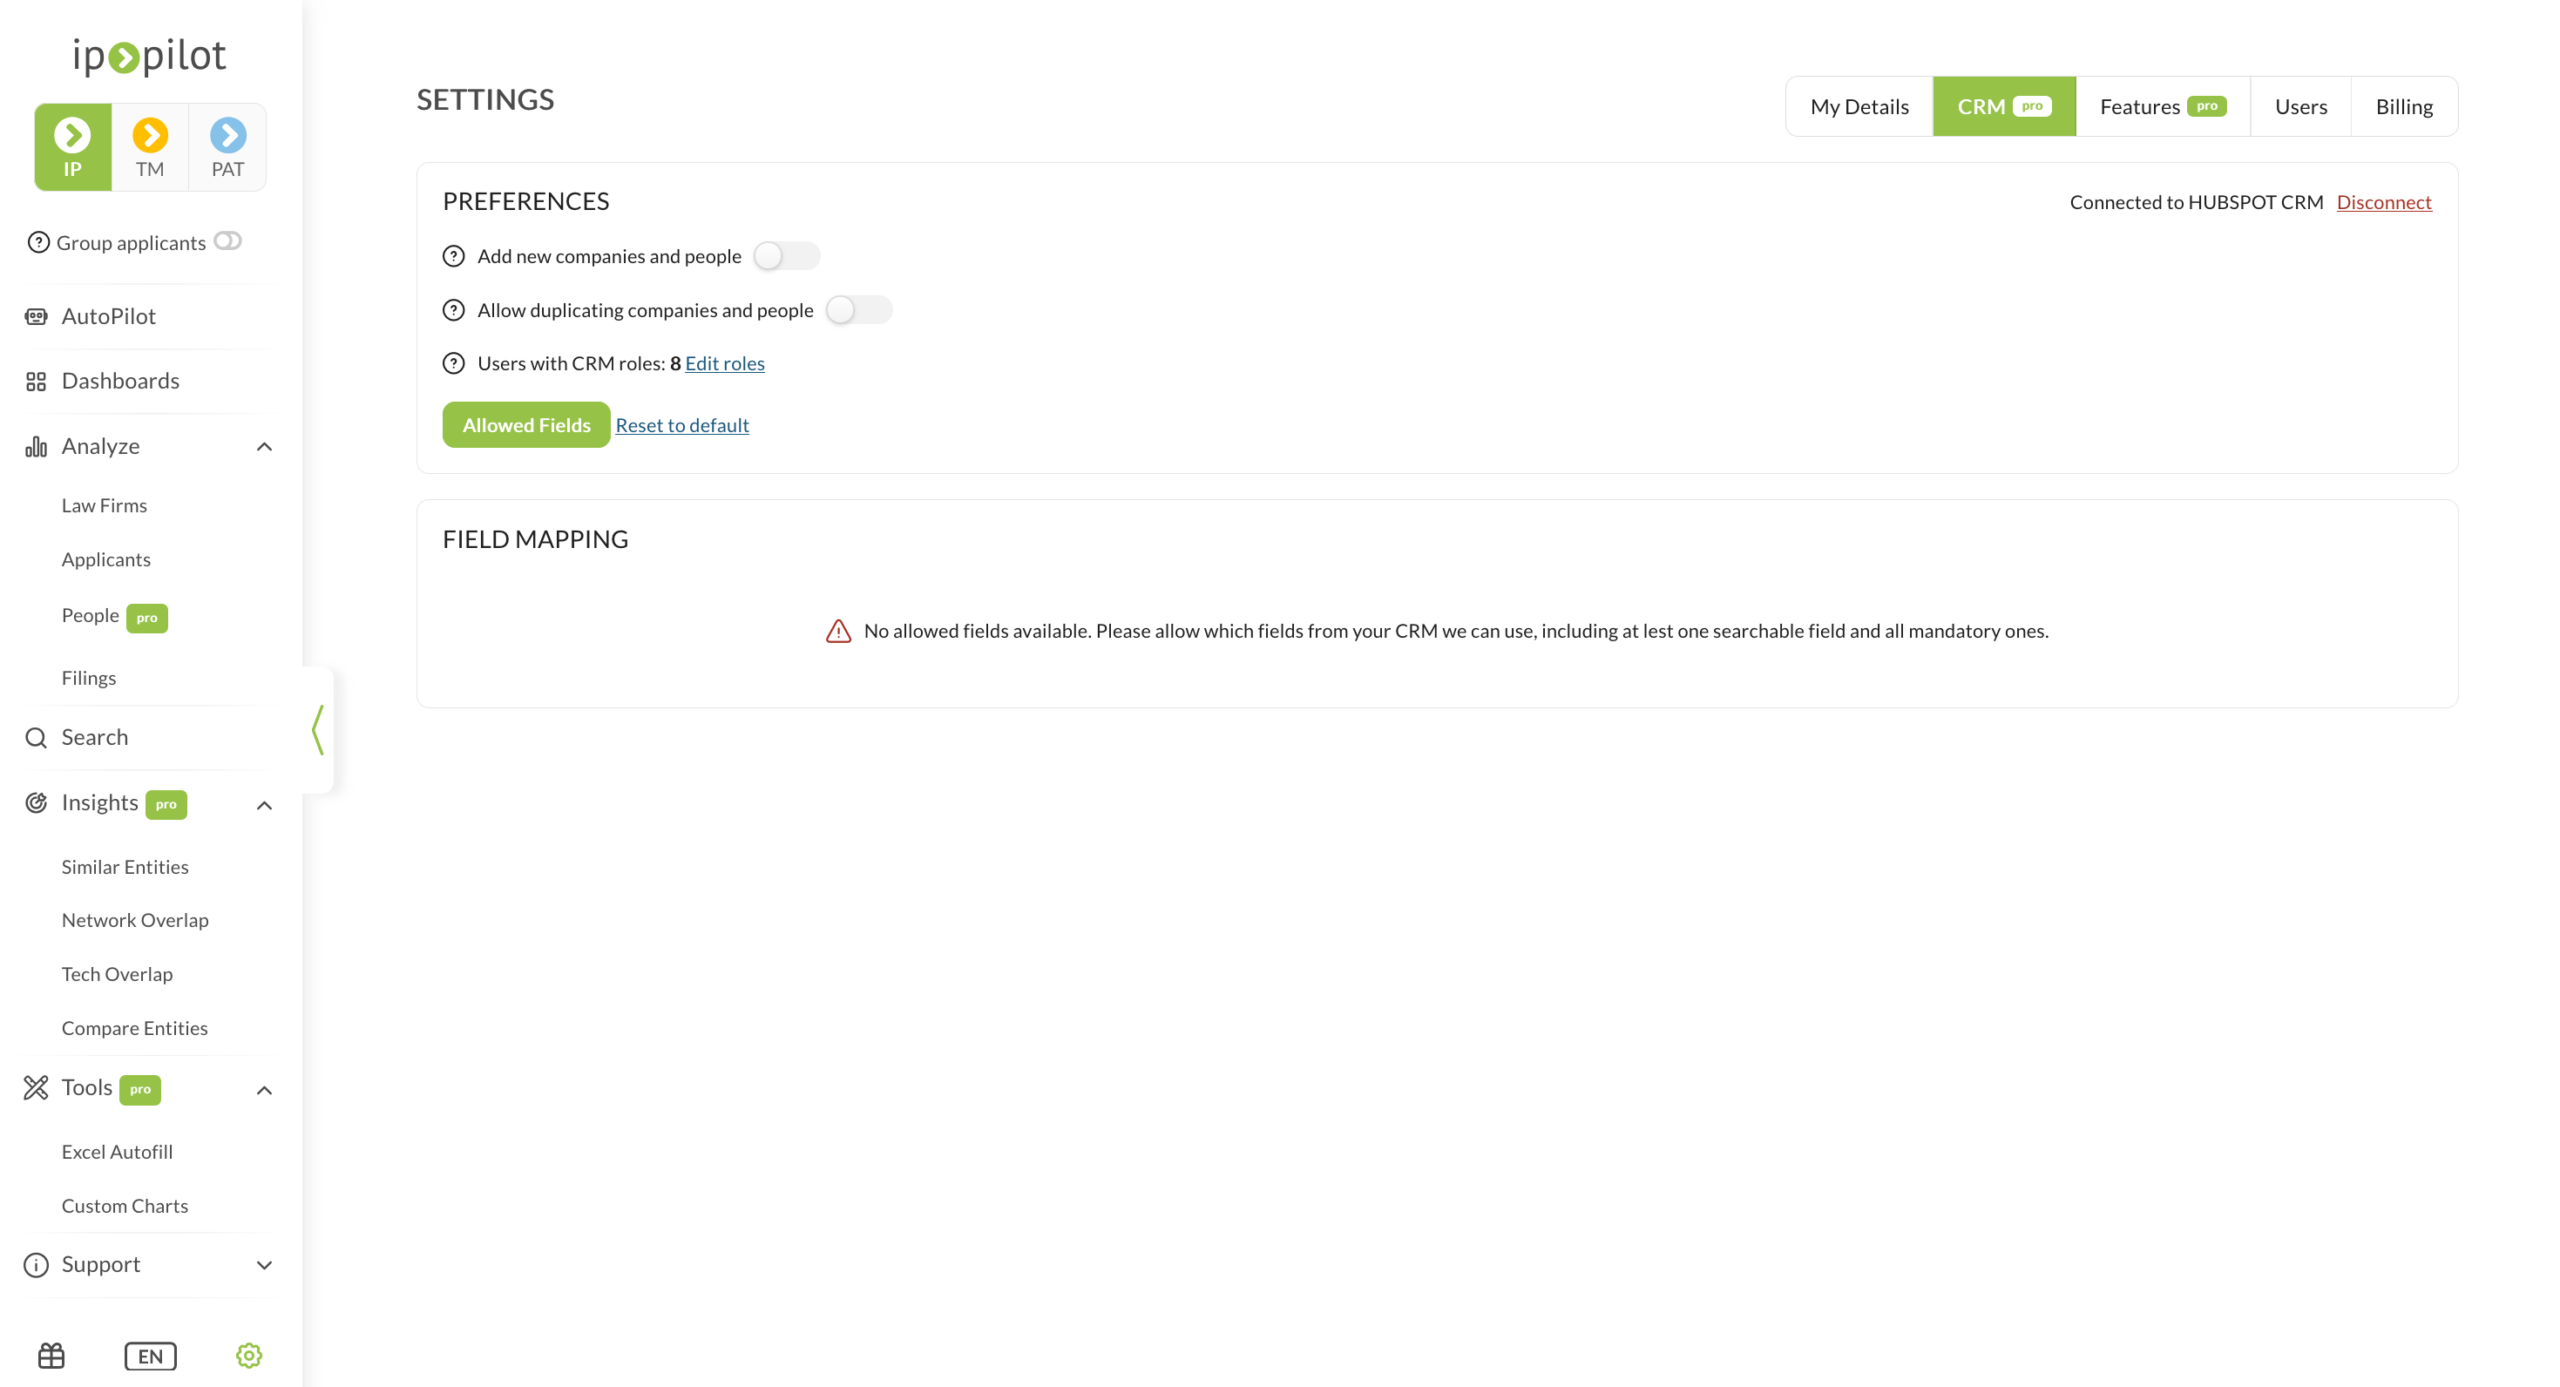
Note: The screenshots show HubSpot. Salesforce and Microsoft Dynamics use the same steps, each with its own authorization screen.
2. Map the fields #
Field mapping decides which IP Pilot value goes into which CRM property. It also decides what happens when that property already holds a value. It has three parts: the preferences, the allowed fields that IP Pilot can write to, and the mapping itself.
Set the preferences #
Preferences is at the top of the CRM settings page.
- Add new companies and people lets IP Pilot create company and contact records that do not exist in the CRM yet. IP Pilot creates them only when you approve them at push time.
- Allow duplicating companies and people lets IP Pilot create a second record for a company or contact that already exists. Again, this happens only when you approve it at push time. Leave it off if your CRM must keep unique records.
- Users with CRM roles shows how many IP Pilot users have CRM access. Click Edit roles to set each user as a CRM admin or as a user with push access only. You set the roles themselves under Settings › Users.
- Allowed Fields opens the list of CRM properties that IP Pilot can write to.
Choose the allowed fields #
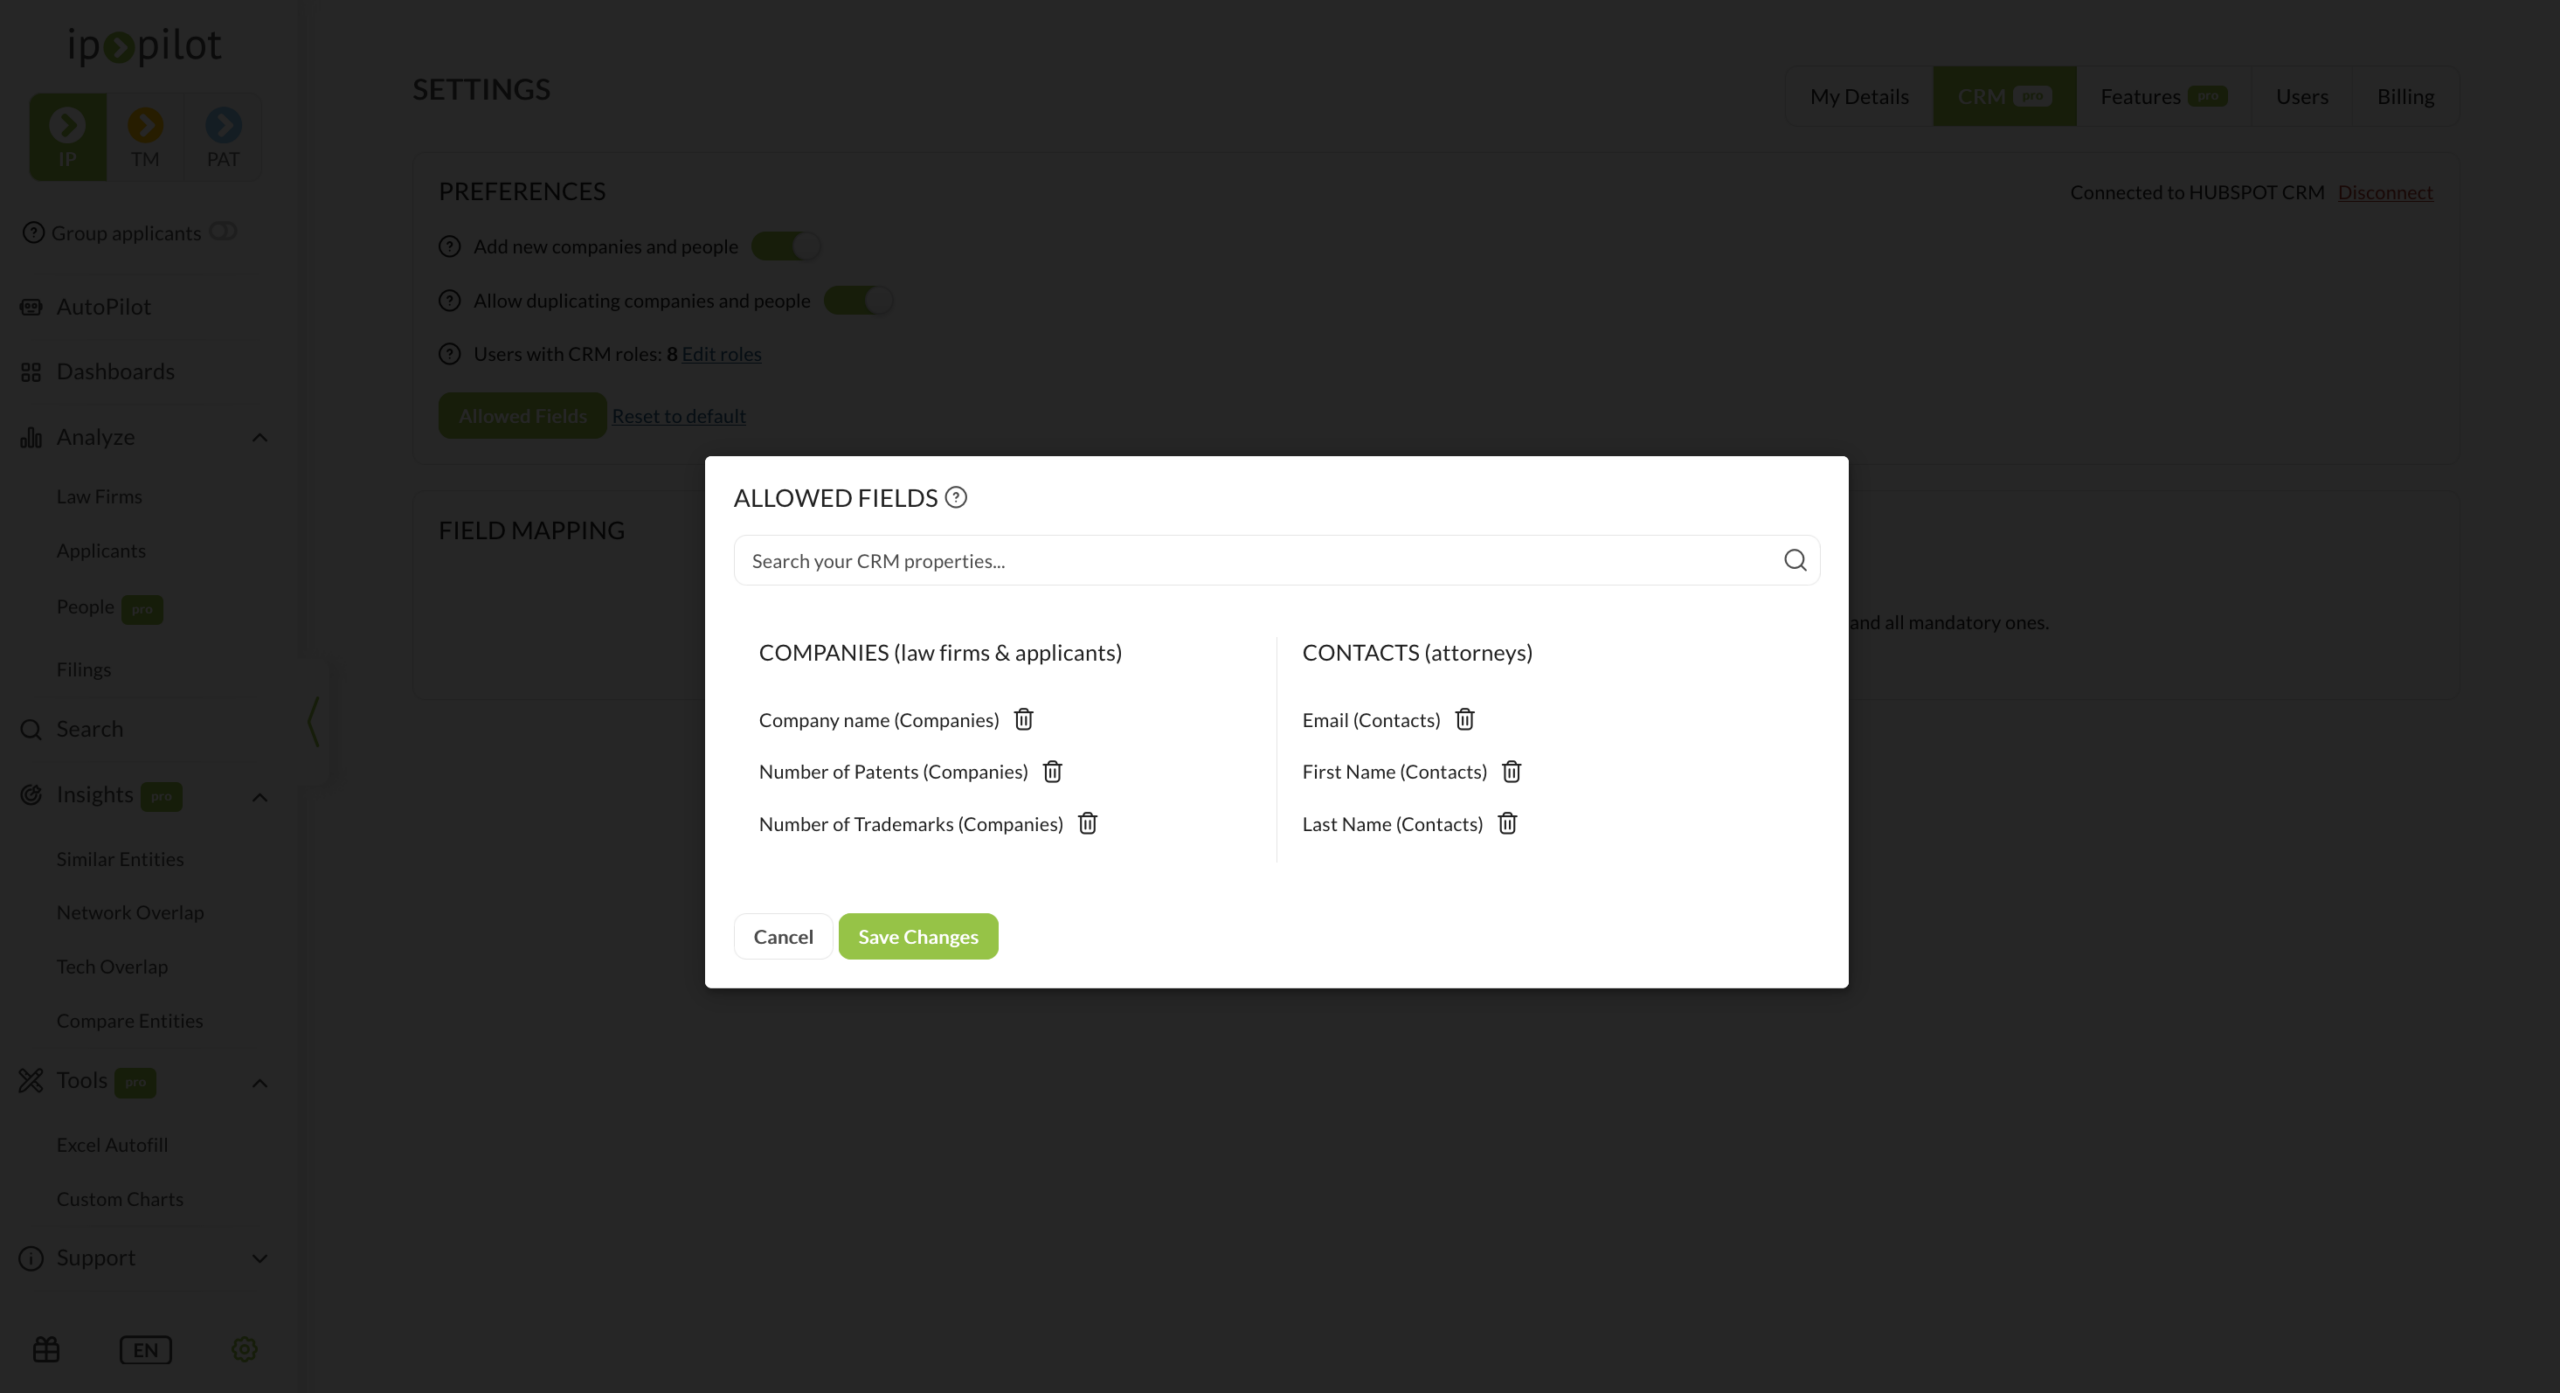
- 1Open Allowed FieldsClick Allowed Fields under Preferences.
- 2Find the propertiesUse the search bar to look through the properties in your CRM.Note: If a property is not listed, it does not exist in your CRM yet. Create it there, then refresh this page.
- 3Select what IP Pilot can write toSelect each property that you want to use in the mapping. The properties are in two groups: Companies, for law firms and applicants, and Contacts, for attorneys. Typical company properties are Company name, Number of Patents and Number of Trademarks. Typical contact properties are Email, First Name and Last Name.
- 4SaveClick Save Changes. Only these properties show in the mapping step.
Map IP Pilot fields to CRM fields #
Field Mapping has a separate tab for each entity type: law firms, applicants and attorneys. You map each type on its own. A figure for a law firm can therefore go into a different property from the same figure for an applicant.
- 1Add an IP Pilot fieldOpen the tab for the entity type, click Add Field and select the IP Pilot field, for example Name, Patent Filings or Trademark Filings.
- 2Choose the CRM fieldSelect the matching CRM field from the allowed fields you saved.
- 3Set the Update OptionChoose Skip if existing to keep a CRM value that already holds data. Choose Overwrite to replace it with the IP Pilot value.
- 4SaveClick Save Changes. Mandatory fields, such as Name, are marked. All other fields are optional.
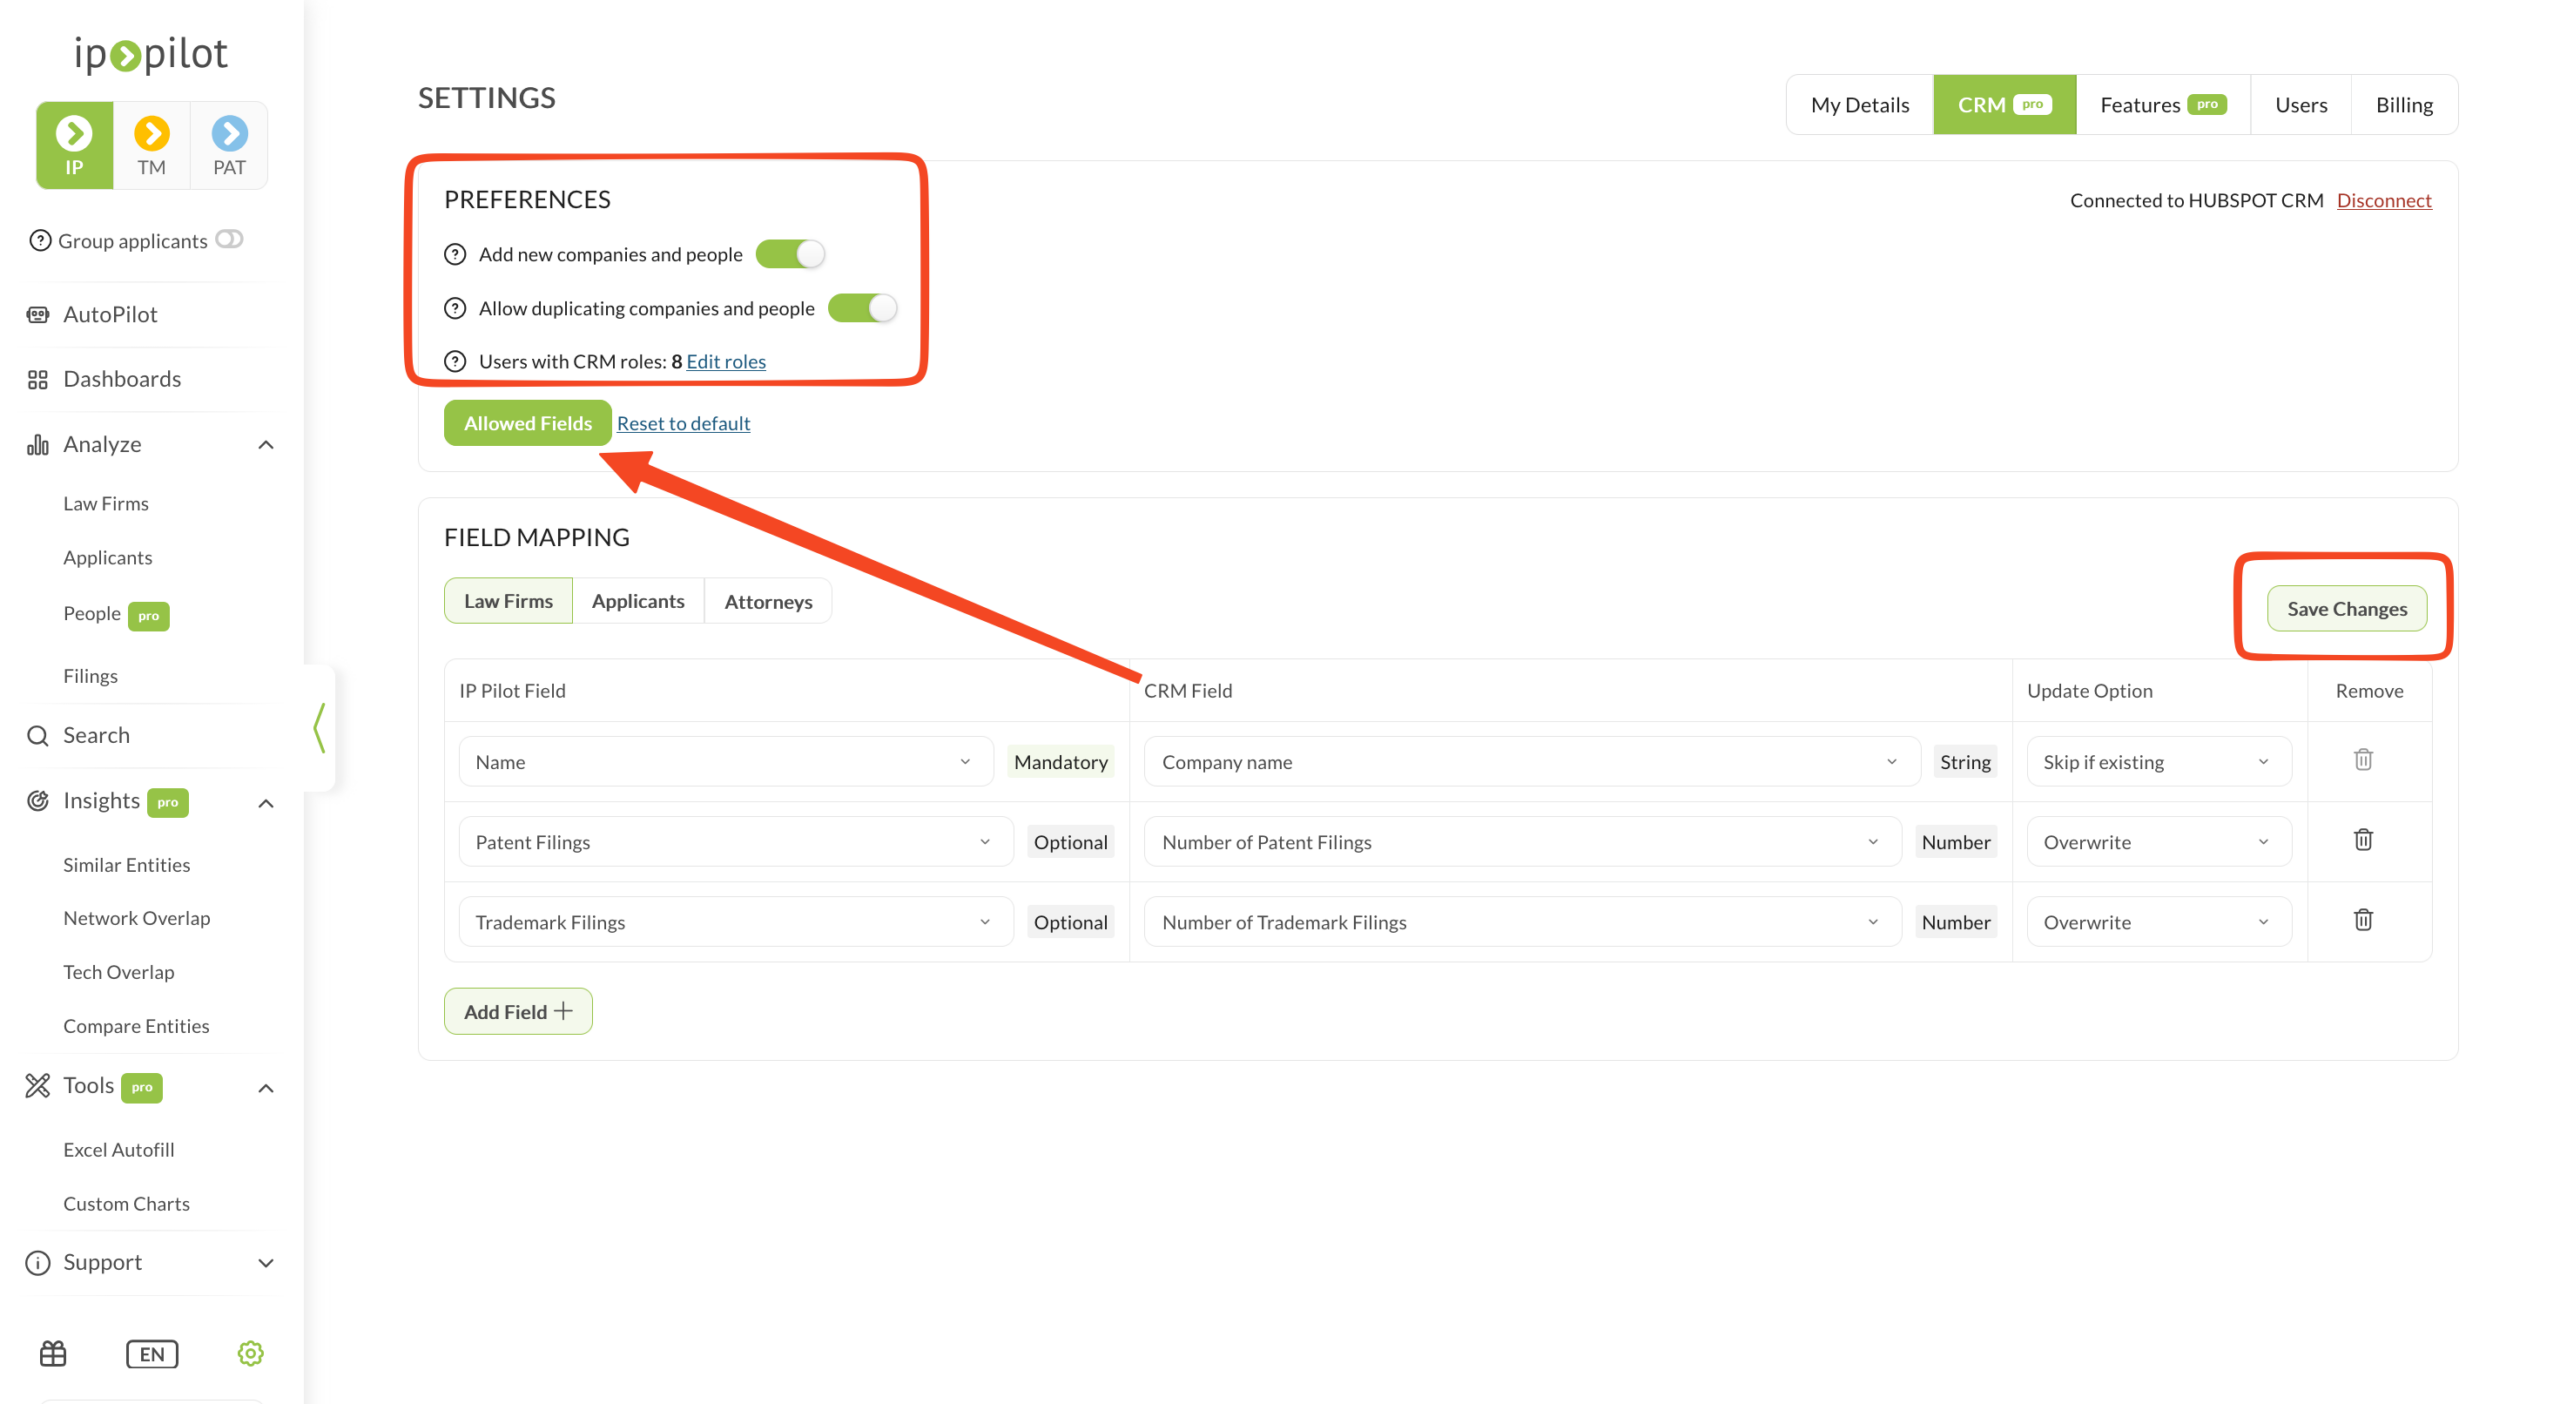
Why the Update Option matters. You set it for each field. Set filing figures to Overwrite, so that every push keeps them current. Set fields that your team maintains by hand, such as contact data, to Skip if existing, so that a push does not replace their edits. Empty fields are filled with either option.
3. Push from a profile #
When the mapping is saved, any user with a CRM role can push. A push covers one profile at a time.
- 1Open a profileLoad a law firm, an applicant or an attorney.
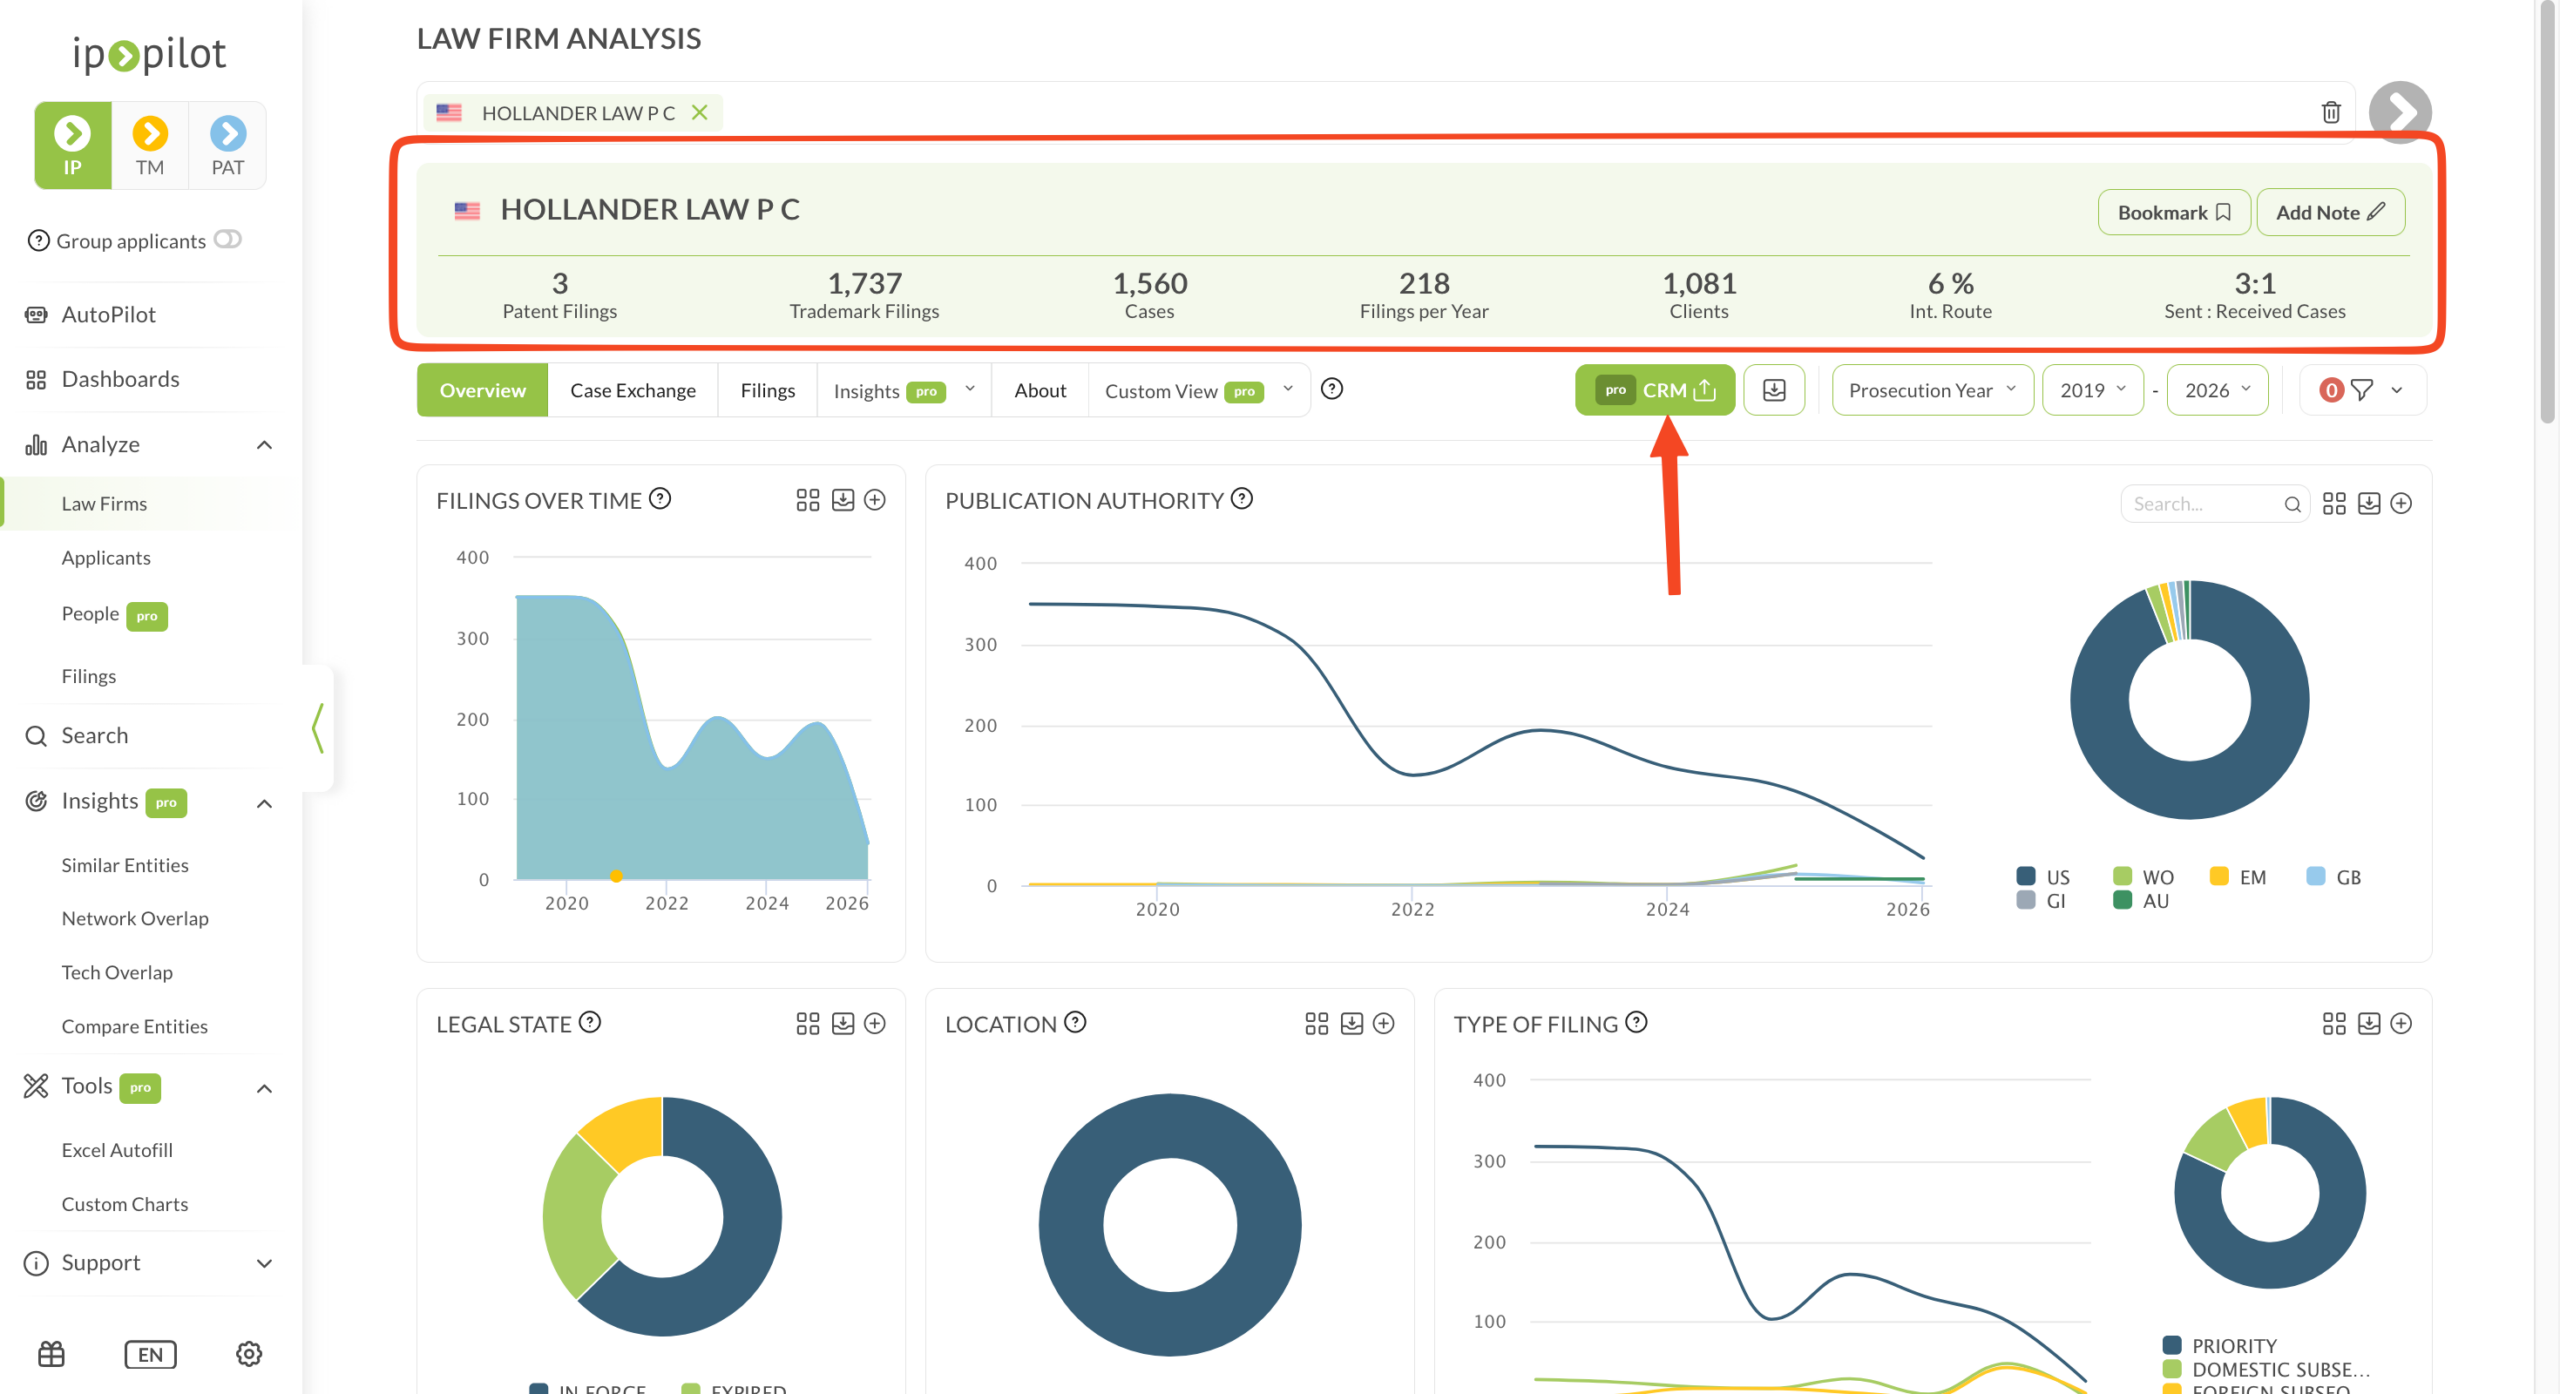
- 2Check what you are about to sendA push sends the values that are on screen. Check the year range, the year type and any active filters in the control bar first.
- 3Start the pushClick CRM in the control bar, next to the year type selector.Note: The button has a pro badge and shows on law firm, applicant and People profiles. There is no Push to CRM item in the sidebar.
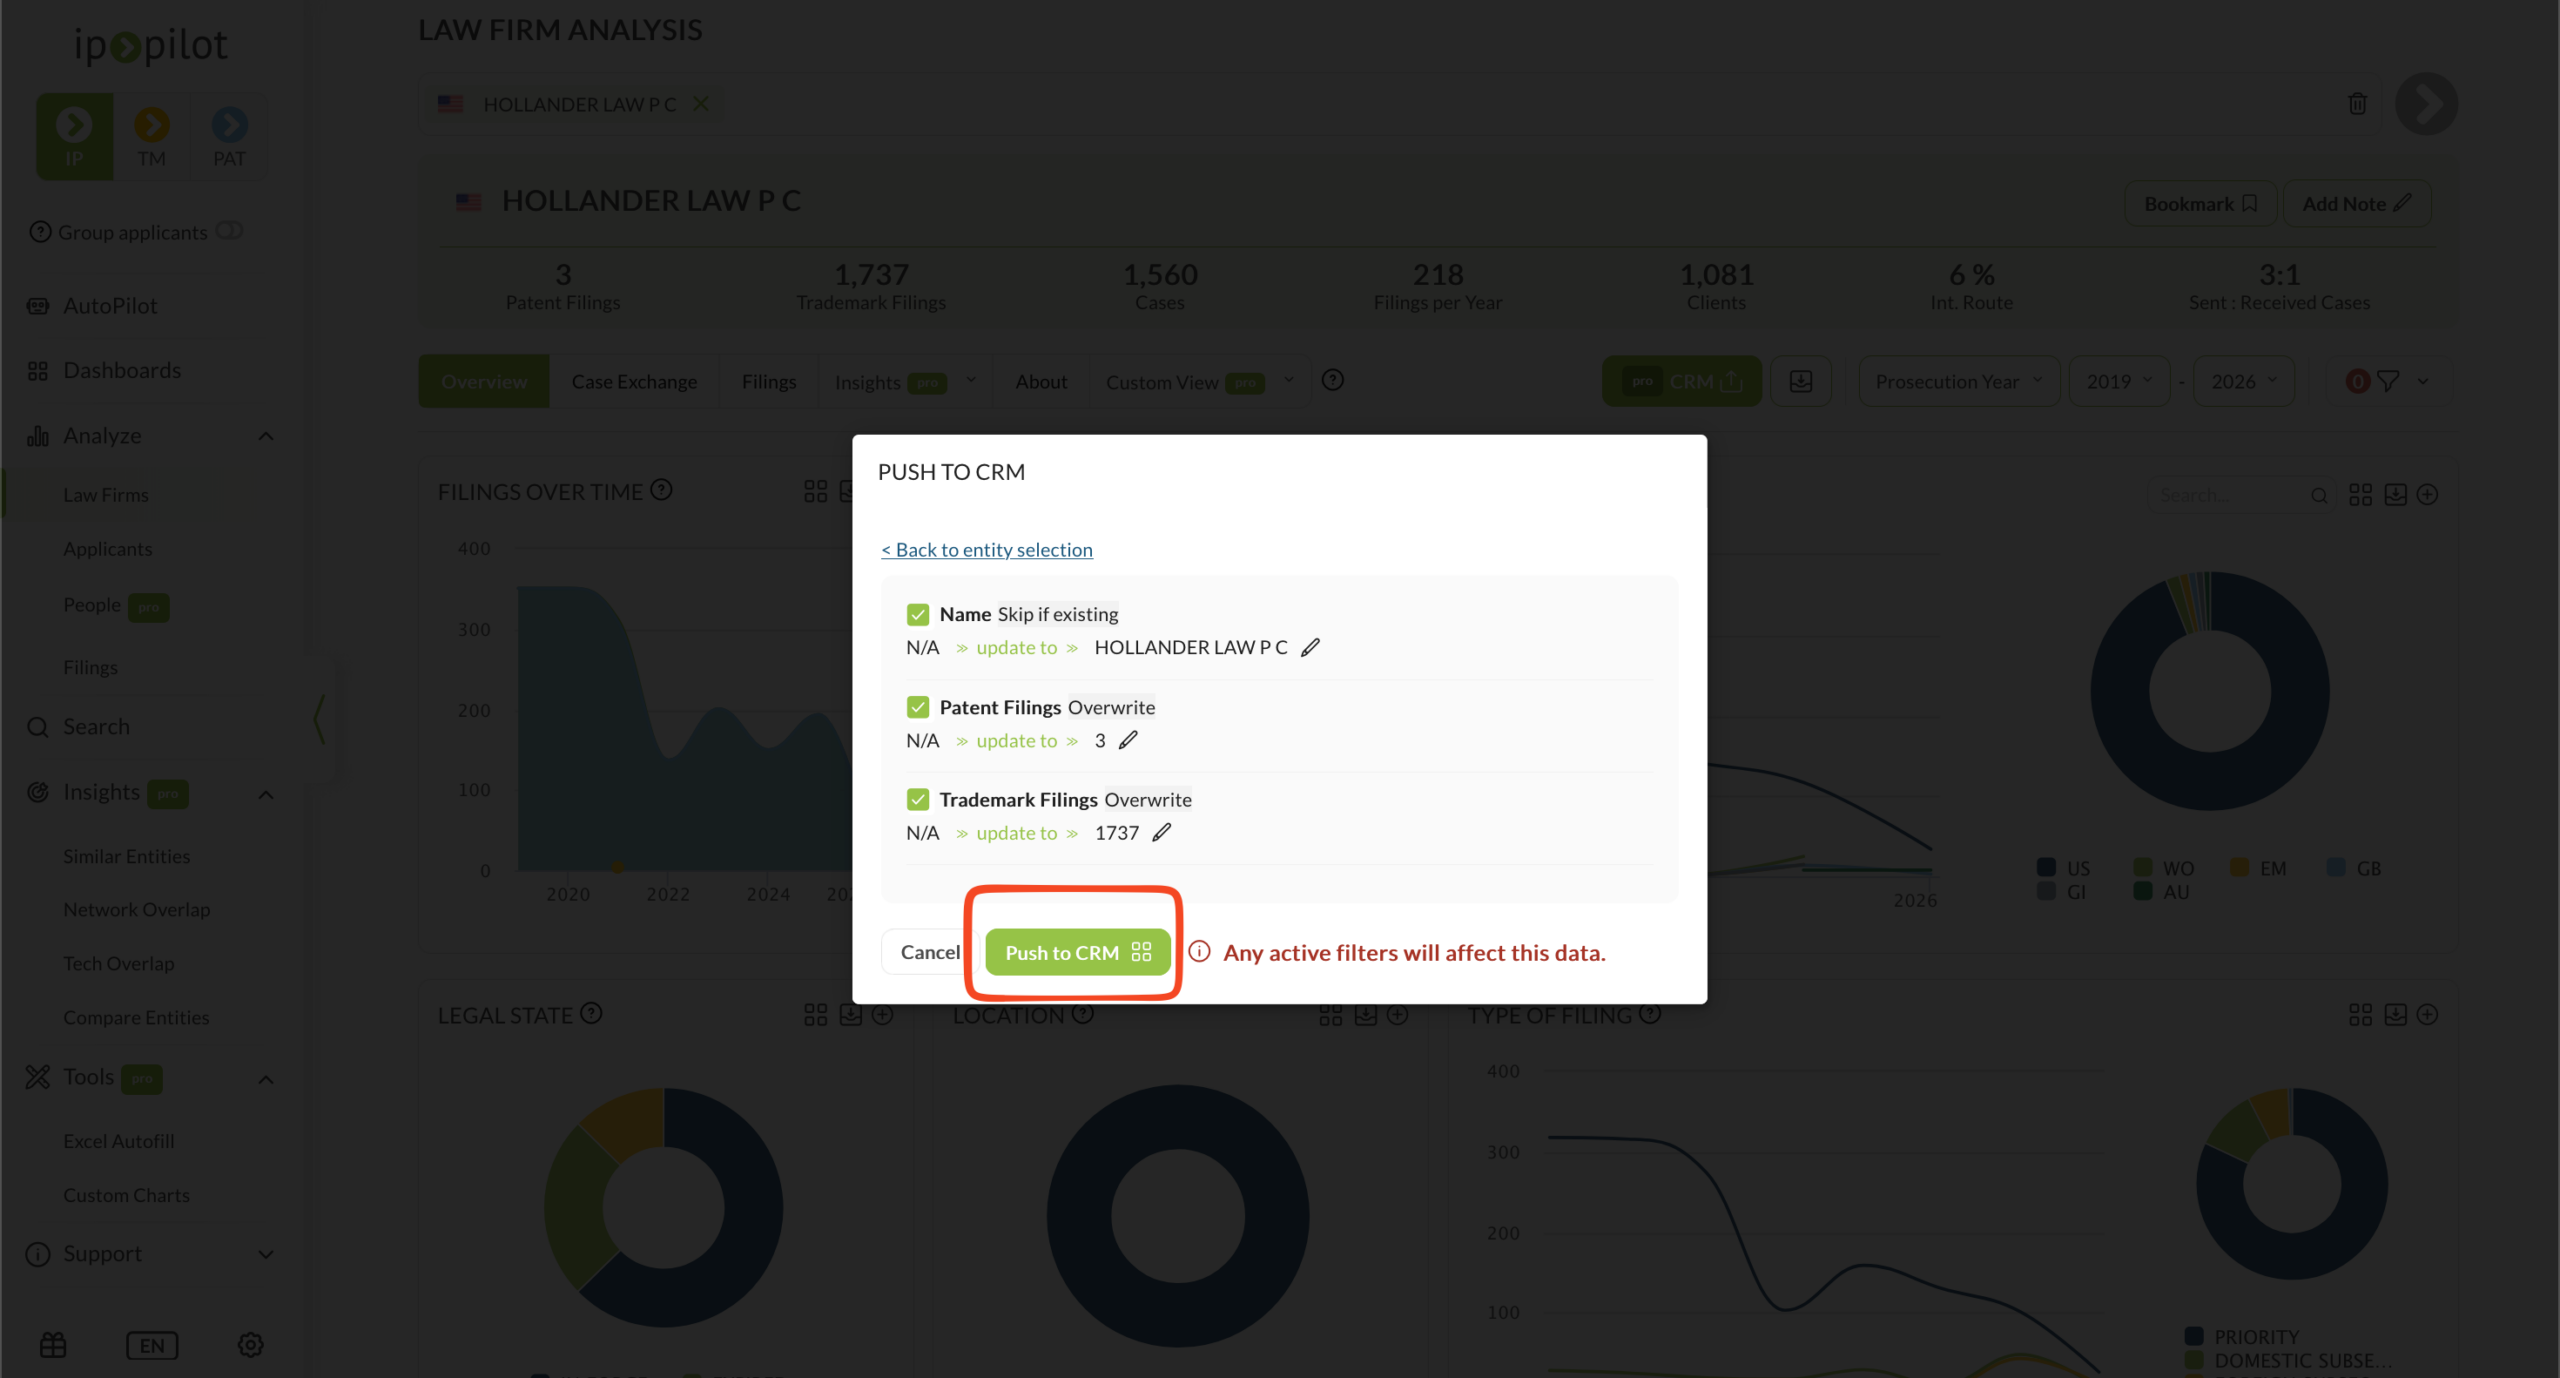
- 4Choose the destination recordIP Pilot searches your CRM for a matching name. Select the record you want, or search for a different name. You can also paste the record’s URL from your CRM into the Destination Link field. If nothing matches, IP Pilot opens the New Entity section, where you can create the record.Note: To create a record here, Add new companies and people must be enabled in Preferences.
- 5Preview, then pushClick See Preview to check, field by field, what IP Pilot will write. Then click Push to CRM to send it.
In practice #
Push to CRM replaces two jobs that firms otherwise do by hand.
Keep client filing volumes current in your CRM #
You may check a client’s filing volumes in IP Pilot and then type them into your CRM, to keep a view of the client’s portfolio. Map those figures once, and each update then takes a few clicks. Set the filing figures to Overwrite so that every push refreshes them. Leave fields that your team maintains by hand on Skip if existing.
Capture a prospective attorney’s contact details #
When you have found an attorney to approach, push the attorney’s contact details and filing volumes into the CRM as a contact record. You do not have to copy them by hand. Map the Contacts properties, such as Email, First Name and Last Name, on the attorneys tab in Field Mapping.
4. Check what a push writes #
- Mapped fields only. The values come from the profile’s KPI bar, plus the contact details on an attorney profile. Charts and tables are not pushed. Exports explains how to export them.
- Filters and the year type change the numbers. A figure pushed with a jurisdiction filter is not the firm’s worldwide total, and the CRM record does not show which filters were active. Navigating the App explains the controls.
- Existing values follow the Update Option. Skip if existing keeps what is already in the CRM. Overwrite replaces it. Empty fields are filled with either option.
- A push is a snapshot, not a live sync. The values do not update later on their own. Push again to get current figures.
5. Give users CRM access #
Push to CRM is part of Pro, and access to it comes from the user role. You set roles for each user under Settings › Users. There are four roles:
| Role | Administers the IP Pilot account | Can work with the CRM |
|---|---|---|
| Admin | Yes | No |
| Regular User | No | No |
| Admin + CRM | Yes | Yes |
| Regular User + CRM | No | Yes |
- Without a CRM role, there is no CRM tab in Settings. The CRM button on a profile is blocked, with a message that you do not have permission and should speak to your admin. An IP Pilot administrator role is not enough on its own: the role must include CRM. Ask the person who administers your IP Pilot account to change your role to Admin + CRM or Regular User + CRM.
- Creating a property is a task in your CRM, not in IP Pilot. The person who administers your CRM does this work. This may not be the person who administers your IP Pilot account.
Frequently Asked Questions #
Frequently Asked Questions #
Push to CRM #
What is the difference between Skip if existing and Overwrite?
The Update Option decides what happens when the CRM field already holds a value. Take an attorney whose Email field in your CRM reads
abc@def.com, where IP Pilot’s value isabc@def.eu:- Skip if existing: the field keeps
abc@def.com. - Overwrite: the field is changed to
abc@def.eu.
Empty CRM fields are filled either way. Set the option per field, so you can overwrite filing figures while leaving manually maintained contact data alone.
- Skip if existing: the field keeps
A CRM property I need is missing from the Allowed Fields list.
The Allowed Fields list shows the properties that already exist in your CRM. IP Pilot does not create them for you. Create the missing property in your CRM first, then refresh the CRM settings page in IP Pilot and search for it again.
My firm’s CRM is not listed. How can I push IP Pilot data into it?
IP Pilot currently connects to HubSpot, Salesforce and Microsoft Dynamics only. Write to support@ip-pilot.com with the name of your CRM. Support can tell you if and when a connection becomes available. In the meantime, Excel Autofill and Exports give you the same data as a file you can import yourself.
Why can’t I see the CRM tab, or the field settings inside it?
CRM access comes from your user role. Roles are set per user under Settings › Users, and there are four: Admin, Regular User, Admin + CRM and Regular User + CRM.
Without one of the two + CRM roles, the CRM tab does not appear in Settings at all, and the CRM button on a profile is blocked. Being an IP Pilot administrator is not sufficient on its own. The role has to include CRM.
Ask whoever administers your account to change your role.
Will pushing create duplicate companies or contacts in my CRM?
Only if two things are true: Allow duplicating companies and people is enabled under Preferences, and you approve the duplicate at push time. The same applies to brand-new records: Add new companies and people has to be enabled, and you still confirm the new entry yourself before anything is written.
Does Push to CRM send everything on the profile?
No. Only the fields you have mapped are pushed, and the values come from the KPI bar of the profile plus, for attorneys, the contact details shown on the profile. Charts and tables are not pushed. Use See Preview before every push to confirm exactly what will be written.
Do my filters and year type change the values that get pushed?
Yes. The KPI values follow the year range, the year type and any active filters, exactly as they do on screen. A figure pushed with a jurisdiction filter applied is not the same figure as the firm’s worldwide total. Check the control bar below the tabs before you push, and see Navigating the App for how those controls work.
I authorized the connection, but IP Pilot still shows my CRM as unconnected.
Go back to the browser tab where IP Pilot was open and refresh the page. The connection is established in the CRM’s own tab, and IP Pilot picks it up only after a reload. Once refreshed, the top right of the CRM settings page reads Connected to … CRM with a Disconnect option beside it.
Can I push a whole list of firms at once?
A push starts from an open profile, so entities go across one at a time, each with its own match and preview step. For the same data points across a long list of entities, use Excel Autofill and import the resulting file into your CRM.